* * * * * * * * * *
HAPPY NEW YEAR, ONE AND ALL!
Week #1
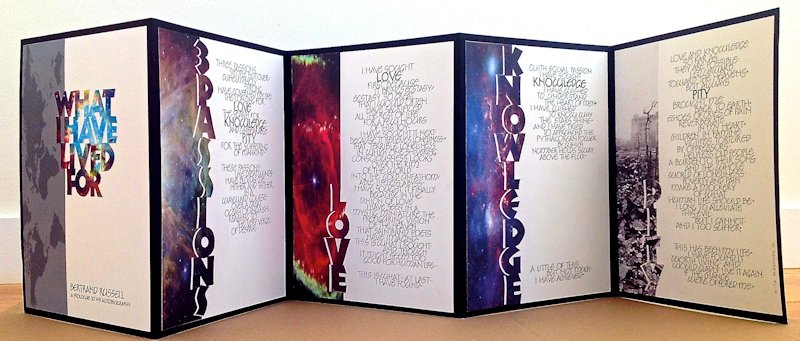
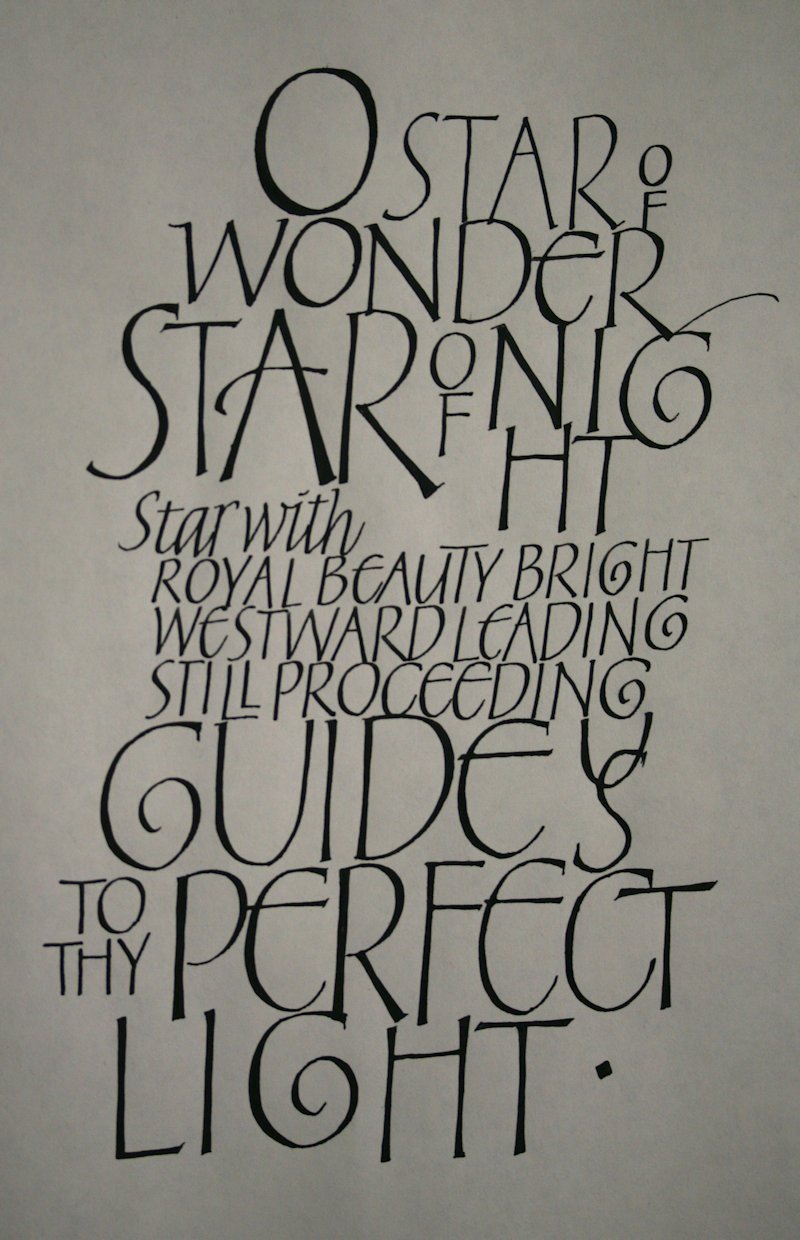
This work was done by Nita Padamsee in Boston last year for the fourth session in PRIMITIVE TO MODERN. In her own words:
|
This piece was done for
the first month of 26 Seeds, ‘Monoline Romans.’ It is 42.5” X 11” when
open and each panel is 8.5” X 11”. When Reggie first gave us the task of transforming Bertrand Russell’s prologue to his autobiography What I Have Lived For, I found myself still seeking inspiration. Of course, I turned to YouTube, and found a recitation of the text that brought this particular phrase to life: “Love and knowledge so far as they are possible led upward toward the heavens, but always pity brought me back to earth.” I wanted to juxtapose love and knowledge with pity as starkly as Russell captured the disparity. In order to exemplify the former two, I visited the Hubble website and downloaded copy write free pictures that encapsulated the exalted, heavenly nature of the words. I portrayed pity on earth as the antithesis of heaven by using an image of barren destitution and destruction, that we, as humans, are both victimized by and perpetrators of, as we subvert our passions. Rather than kindling the fire of our passion, we use this fire as arson in our lives. If we think of passion as a strong and uncontrollable outburst of emotion, we see that there are two paths passion can follow: one, a quest for ecstasy, and the other, a fervent savagery. I hope we yearn for the path that uplifts us. |
I chose three Hubble images with colors that best represented the three words, Passion, Love and Knowledge. Having studied works of Rudolf Koch and Friedrich Neugebauer during this class and in the past, the two styles seemed to complement each other. For the words written vertically, I first wrote them out on tracing paper and then transferred them on the Hubble images that I had printed on matte photo paper. Each letter had to be touching in order to cut it and move it as a unit. I then pasted this onto white paper & made copies onto Arches 90lb HP watercolor paper. This same technique was used for the letters on the cover however; I didn’t need to move the phrase, it was just cut and pasted onto the background. The body type was done with a micron .02 marker. Each panel was mounted on an accordion folded black Canson paper. Thanks for viewing my work. |
* * * * * * * * * *
This work was done by Nancy Galligan in Boston in 2012 for the third session of "26 Seeds: a Year to Grow".
In her own words:
|
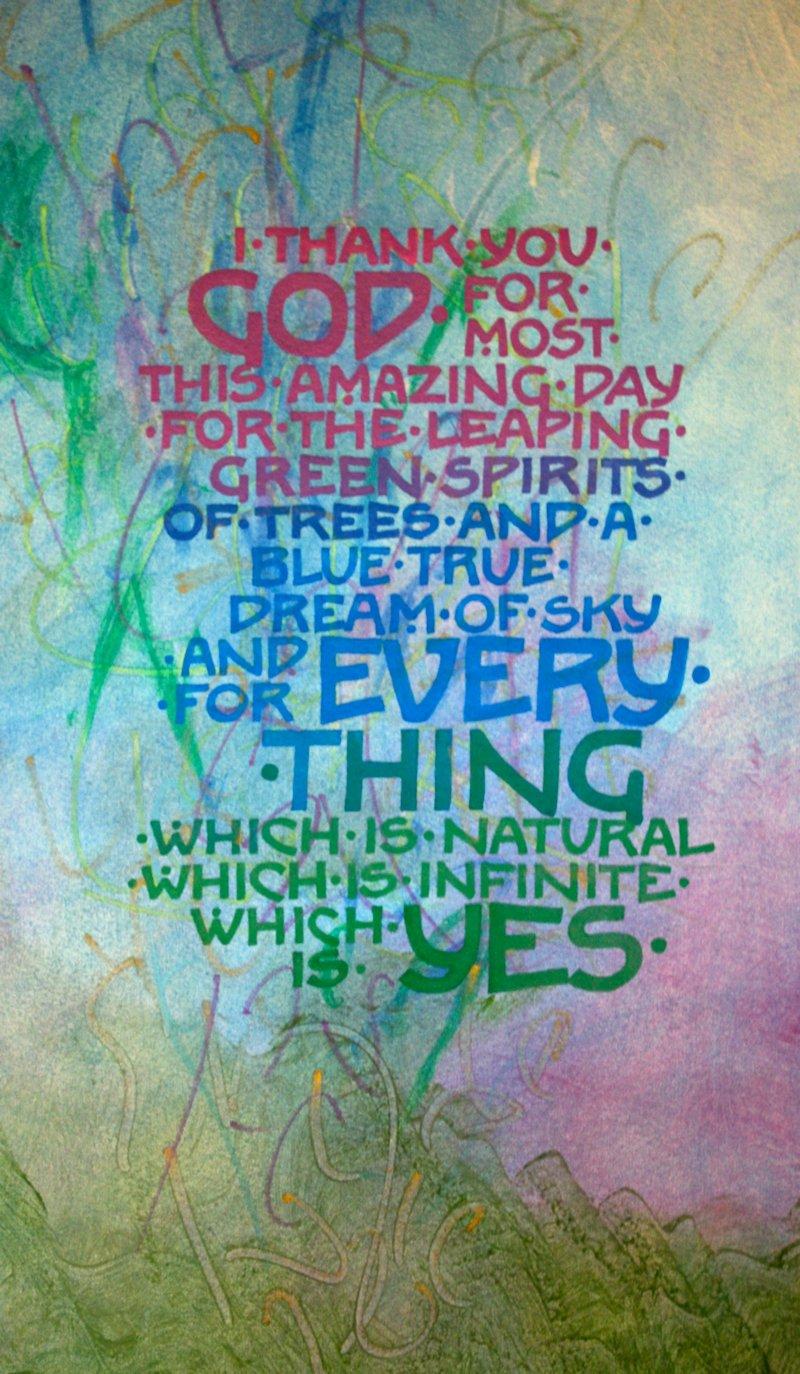
This was one of the assignments I completed
for Session 3 of 26 Seeds, Roman Variations. I love this poem by e.e.
cummings. I fell in love with the results of writing with a B-nib and squaring the letters off with an 66EF nib when Reggie introduced us to this process during class with Neugebauer's lettering. Neuland is one of my favorite alphabets. This alphabet that I chose for this piece is based on the lettering style of one of Rudolf Koch's contemporaries and a like-minded lettering artist, Rudolf von Larisch. I have had a sample of his lettering in a binder for a very long time, have always admired it and wondered how von Larisch did it. It was an "AHA!" moment when I realized that I could effect this style by using a Speedball B and 66EF in the same manner as the Neugebauer letters. |
The paper is Arches Text wove,
12" x 19", which I had paste-papered. I mixed Winsor-Newton gouache to match the rose, green, and blue colors of the paper. For the bulk of the text I used a Speedball #2 B-point and chose to highlight the words God, Everything, and Yes with the larger #1/2, Speedball B. The letters written with the smaller nib are not quite a 1/2 inch tall, the larger are written one-inch tall. This sizing helped me with my design/lay-out when I chose to write smaller lettering right next to large. |
* * * * * * * * * * * *
This work was done by Marcia Watt in Atlanta in 2012 for the second session, "Writing on Vellum"
for PRIMITIVE TO MODERN. In her own words:
|
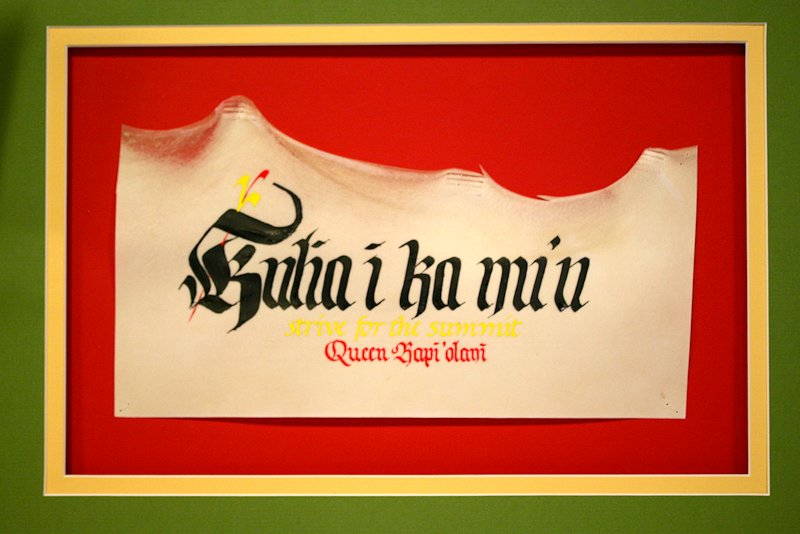
I did this piece for homework for the second session of From
Primitive to Modern. This assignment asked us to use one or more
of the Blackletter styles we'd worked on in class, but I like to
use Chinese or Hawai'ian quotes and had a hard time finding a
Chinese or Hawaiian quote that looked "right" in Blackletter. I
tried all sorts of letter forms and quotes before finally
deciding this quote allowed me to successfully combine a popular
Hawai'ian saying with Blackletter. Kulia i ka nu'u Strive for the summit Queen Kapi'olani For the primary quote, I used sumi ink and Reggie's "Italicized Gothic" for the minuscules and "Happy Caps Gone Wild" for the one majuscule. The ornamentation of the majuscule K is meant to look like a kahili, a feather standard reserved for Hawaiian royalty. The English translation is written in Italic, and the attribution is written in Fraktura. Both are written with gouache. I used a piece of vellum that at its greatest size is 11 x 6 inches. |
This particular piece of vellum worked well with the quote
because it has peaks, like the Hawaiian Islands. I like to think
the peak above the "K" is Mauna Kea, the highest point in
Hawai'i. I decided I would use the colors of the Kanaka Maoli
(native Hawaiian) flag, as Queen Kapi'olani was the wife of King
David Kalakaua, the last king of Hawai'i. The colors represent
green for land, red for blood, and yellow for feathers used in
sacred capes of the royalty. I used fishing line to attach the finished piece to mat board. I poked two small holes about a quarter of an inch apart in each corner and into the mat board, then simply sewed the vellum to the board. In the future, I would make the yellow a bit darker, as it is difficult to read on the vellum, though it seemed just fine on a similarly colored piece of practice paper. |
* * * * * * * * * *
This work was done by Carol Gray in Atlanta in 2012 for the fifth session Design: Deconstructing the Grid in PRIMITIVE TO MODERN. In her own words:
|
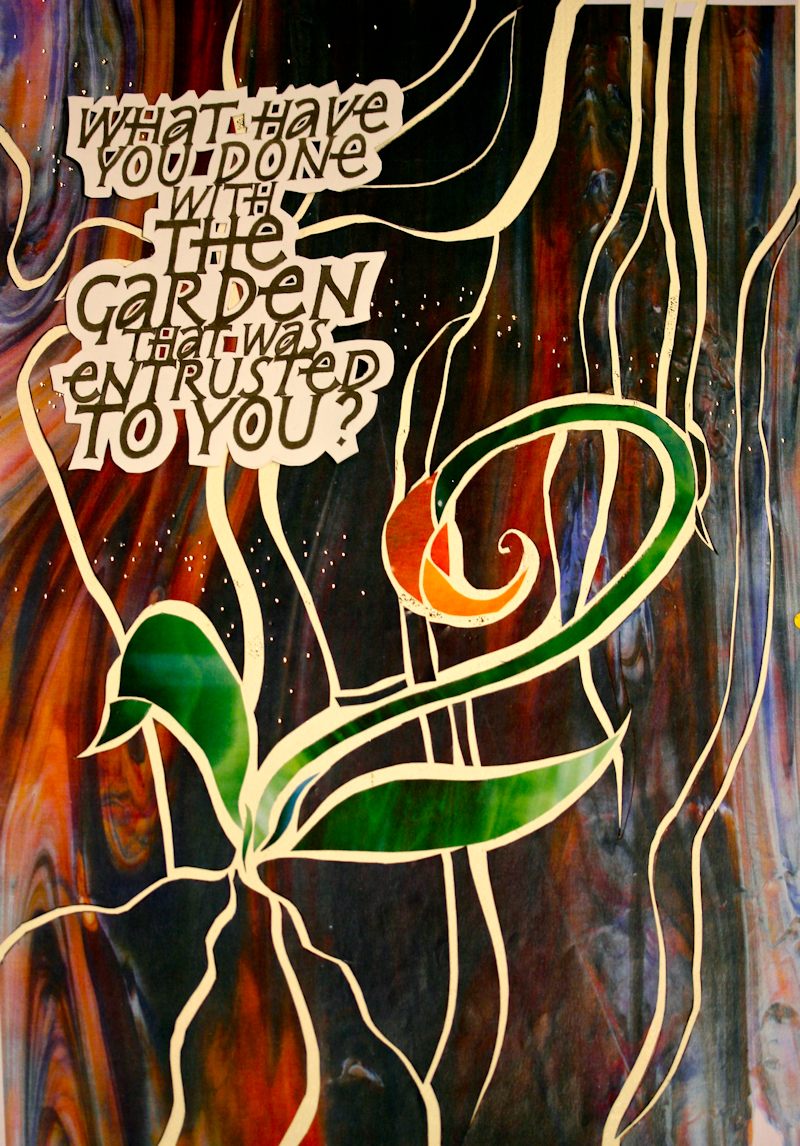
In the fifth session of Primitive to
Modern, we worked on an in-class project that was completely
different from anything I had ever tried before. The amazing
thing was that virtually everyone's piece was successful.
We started by working with a short quote of our choosing, in the wonderfully user-friendly style of Raucous, done with Speedball B series nib and then retouching, drawing in and squaring off the serifs with a micron pen. After we were satisfied with the lettering, we used the copiers we had brought to class to reduce and enlarge, on paper, as well as on transparencies. This enabled us to play with the design and sizes and stack the lines of copy without any interlinear spacing. The final design was xeroxed onto white paper. Reggie had brought many 11" x 17" color copies of stained glass pieces, which we were able to choose from. He also gave us a 15" x 22" sheet of heavy Fabriano paper, that had been waxed so that things could be positioned and moved on it easily. After selecting our stained glass copies, we used the time to sketch a simple design on tracing paper and then layed it over the print to find a pleasing position. The ultimate goal was to cut the design apart and put it back together, leaving spaces of varying widths between the pieces, something like a jigsaw puzzle. Since my quote referred to a garden, I had drawn a simple plant shape and allowed the lines of the stained glass image to flow through and around it. We also had to think about the placement of our quote in relationship to the image. |
After the image on the tracing paper was transferred onto the
xerox, I began cutting out the pieces and placing them one at a
time onto the waxed surface, leaving small amounts of space in
between. As we worked this way, many adjustments to the space
were made to give it more interest. Reggie suggested that I try
a small amount of orange for the flower itself (not a color I
would have normally picked) and I was pleasantly surprised with
the contrast. The quote itself was adhered giving it a raised
effect, which could even be enhanced further using small pieces
of foam core behind it. The actual size of this image is 17" x
12". Once the image was positioned, we were encouraged to add dots with a hot foil pen and also to create larger dots, using a hole punch and other papers, that could be glued on top. I didn't get finished with this process, but it was suggested that we continue it at home. Reggie took pictures of everyone's piece and later sent us the image, asking us to have them printed in various sizes. I was surprised that my image looked as good as it did in his photo. I enjoyed this exercise so much that I went on to create my Christmas card using the same technique. |
* * * * * * * *
This work was done by Lydia Batten in 2012 in Boston in "26 Seeds: a Year to Grow". In her own words:
| It's getting close to Christmas, and still no idea for a Christmas card has taken hold. Because really, who can come up with one in July? I tried--and failed. Right after Thanksgiving, I treated myself to two new Christmas CDs to add to my assortment and then had my husband download them onto the iPod so I could listen to that music on my 'interminable' commutes for December (it seems like such wasted time until the 'aha' moments occur...). I was listening to new the Pink Martini Christmas CD for at least the third or fourth time when the 'aha' moment and the idea for a Christmas card converged! Who has ever been able to make out all the words to 'We Three Kings'???? The word order is so convoluted to meet the meter and rhyme... The Pink Martini version however is so beautiful, and I could actually make out all the words, especially the refrain! I've heard the song countless times over the years but for some reason, in the cold morning darkness in the confines of my car cruising along a snowy road, that refrain reached out and grabbed me, and that's when I knew I had to do something with it. Ideas swirled... I would never get it done for Christmas, but I had homework to do! And so, when I finally sat down to start 'playing', what should have been done in formal Italic for homework came out mostly as Roman caps--mine seem to have morphed to a combination of built up strokes and pressure, and that G with the curly-cue keeps coming back to my hand. I'm trying to add some gestural suggestions here and there as well (cross bar on first A...). I did put in some gratuitous Italic to cover the homework side of things (not my best, but it's a rough draft), but the caps called me back. I have been drawn more and more to this idea of compacting the capitals into interesting formations and text blocks to address the idea of 'borders' or a grid--using a small nib allows me to incorporate all kinds of whimsy and manipulation as well as accomplish many varying sizes of letters. |
This piece is a 'rough draft'--truly. I had done a pencil sketch
of some of these words in my lettering journal earlier in the
week and what went out on this page was an extension of those
first musings. This was done on an 8 1/2 x 11 piece of 'antique'
bond paper (from a box of paper my father rescued from a
dumpster back in the late 70s, and obviously NOT acid free).
This paper is so much nicer to work on than the regular bond
paper you buy these days--Reggie was kind enough to crop out the
hole punches across the top of the page! I grabbed a Mitchell 6
nib, brought out the small jar of ground sumi ink that I've been
slowly using up since May, and began... no guide lines, no
thumbnails, no idea really where it would lead--but it was a
beginning! Note: Reggie has said that once ground, sumi ink
should be used within a couple of weeks otherwise it will get
gooey and break down... Well, I ground this batch months ago and
then put it in a jar. Aside from a reeking stench whenever I've
taken the cover off, it's held up super well over the months and
flowed on the page fantastically for this adventure! I love what happened on this first try. Unfortunately I only had about an hour and a half to devote to this creation. I plan to return to it soon and continue playing with it until I have something a lot smoother. I have a bag full of small glass stars waiting for me--I saw them in the craft store after I had this project idea in my head, and I will figure out somehow a way to get a reduced size print on paste paper of some kind which will be glued to the back of these stars... I've got 12 months till next Christmas... Of course, I still have last year's last minute ideas in a folder too--maybe I can do both???? Remember, we all have star light within us--so if you can't find the light of a star in the sky to guide you along your way, just look inward and wonder at the light lying there... Happy New Year to all! |
* * * * * * *
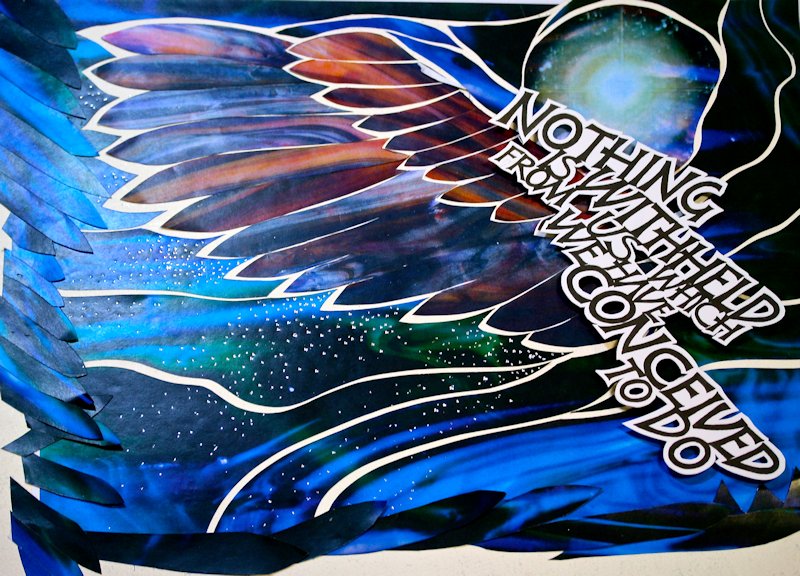
This work was done by Victoria Lansford last year in Atlanta for the fifth session,
“DESIGN: Deconstructing the Grid”, in PRIMITIVE TO MODERN. In her own words:
|
I came across this quote through Joel
Runyan's Blog of Impossible Things. In the post he told of
striking up a conversation about iPads with someone in a coffee
shop. It turned out that the other person had invented the first
ever internally programmable computer and the first digital
image. Seriously, he checked out.
His name is Russell Kirsch, and in the course of the conversation he said, “I guess, I’ve always believed that nothing is withheld from us what we have conceived to do. Most people think the opposite – that all things are withheld from them which they have conceived to do and they end up doing nothing.” Like Joel Runyan, I thought they were words worth repeating (even if I did change the 'what' to a 'which'). When Reggie asked us to think of a symbol to go with our quotes, a wing seemed obvious, but I'm never satisfied with what is obvious. It seemed more in keeping with my aesthetic to make the wing unable to be contained by the page, so after a fast search on my phone for images of hawks' wings, I figured out the basic layout. |
The blue and green feathers were from the area I cut out for the
wing and that I used as a template for the orange and blue
feathers. Since they were on my desk along with all the other
scraps I couldn't bear to throw away, Reggie suggested putting
them around the edges. This was one of those projects that seemed as if it would be simple but quickly took on a life of its own once I began laying out all those feathers. I must have pulled them up and redone them at least 12 times, but that is the beauty of this project. Nothing is static (including the feathers that shifted before the photograph). Everything is possible within the process once you have conceived the idea. Going wild with hot foil pen dots never hurts either. Size:12” X 18” |
* * * * * * * * *
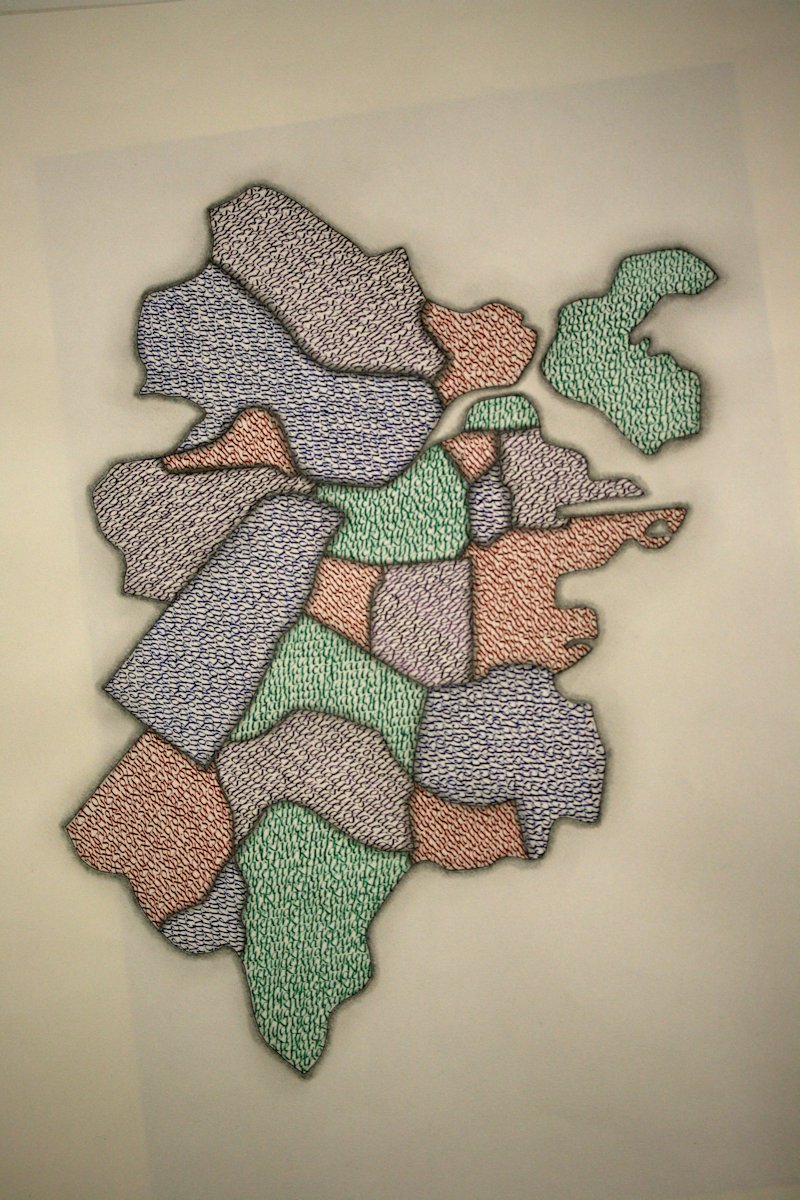
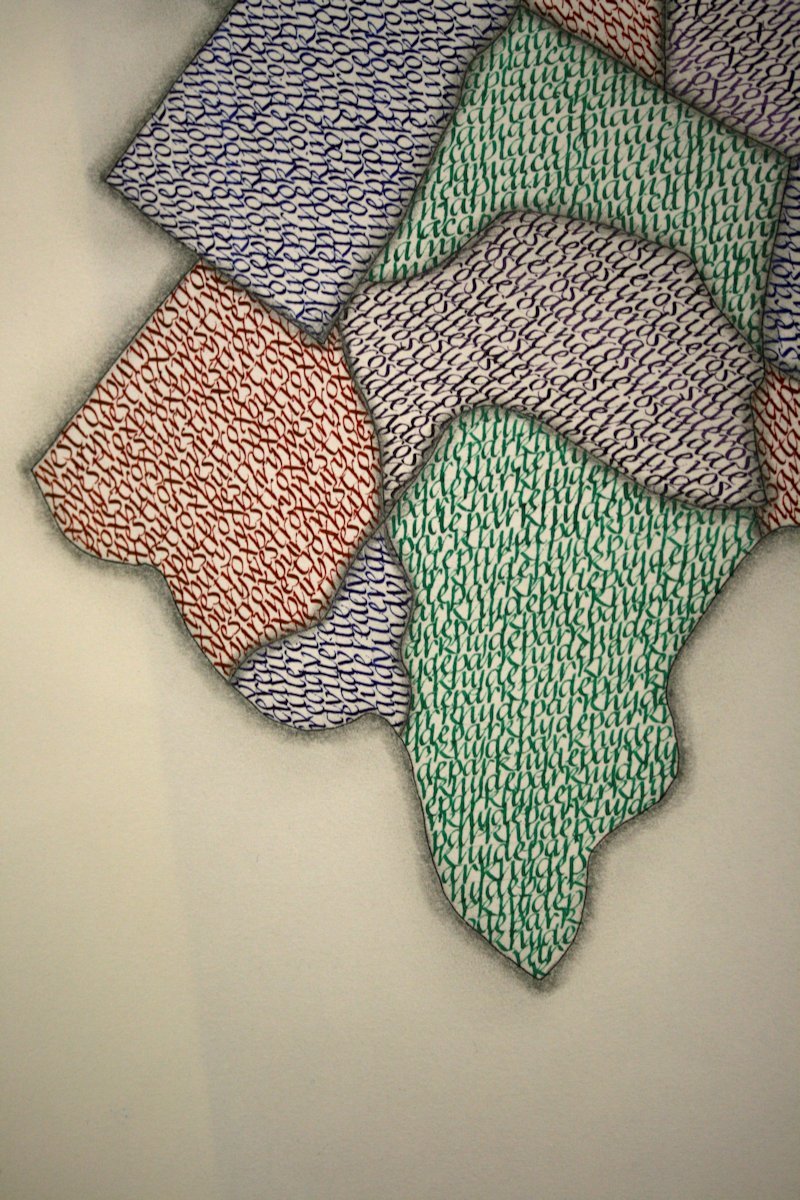
This work was done by Dan Mooney in Boston in 2012 for the fifth Session , Italic and Variations in
“26 Seeds: a Year to Grow”. In his own words:
|
This piece was prepared for the 26
seeds class featuring italic lettering. After spending the last
couple of years re-creating gilded antique maps of Boston, I
thought this would be a good opportunity to try a different
modern technique, rather than re-creating an antique map I
though I could show the different neighborhood of modern Boston
in a contemporary method. Repeating the names of each neighborhood within each boundary writing in four different directions and using four different colors to distinguish each area seemed to make sense. the size is 18" x 24" and was prepared on Fabriano HP watercolor paper with a prepared mitchell nib. The colors are winsor newton inks straight from the bottle. |
The challenge was to keep the lettering consistent and legible
without using uppercase letters or any word spacing. Repeating
the words over and over without spacing became somewhat hypnotic
and a constant attention to spelling became surprisingly
difficult. Another challenge that became increasingly critical
is that when lettering so tightly as a pattern, each letter has
to be carefully executed with the same weight, slant, and
pressure, or a "stray" letter would be blatantly obvious. After all the lettering was done, I was not happy with the look of the neighborhood distinctions, so I used graphite to enhance the borders and outline of the entire city. I think this would make a "wicked cool" (Boston talk) Tee-shirt! |
* * * * * * * *
This work was done by Claire Griffin in 2012 in Boston for Session 5 Italic and Variations, for
"26 Seeds: a Year to Grow". In her own words:
|
I did the two small pieces shown (@ 5
x 7") as part of my homework for my final session of Reggie's 26
Seeds Boston class. I wanted to convey the movement and expressive nature of the Italic hand. These were two in an array of about a dozen one word studies accentuating the capitals that Reggie showed in class. I really enjoyed working with the #6 Parallel pen because the size was big and bold, allowing me to create the statements that I wanted to do. I used canson paper with a bit of texture which lent a nice visual effect for both the ink and the colored pencils that I used to highlight the words. |
All in all I had fun with this process and look forward to
playing with my letters even more in the future. The past two years of study with Reggie have been the most eye opening and productive in my over thirty years of experience as a calligrapher. I will miss the spirit of camaraderie and creativity that was cultivated under Reggie's guidance. Both is the "26 Seeds" and "Primitive to Modern" have given me the opportunity to grow as an artist and lover of letters. |

* * * * * * * * * *
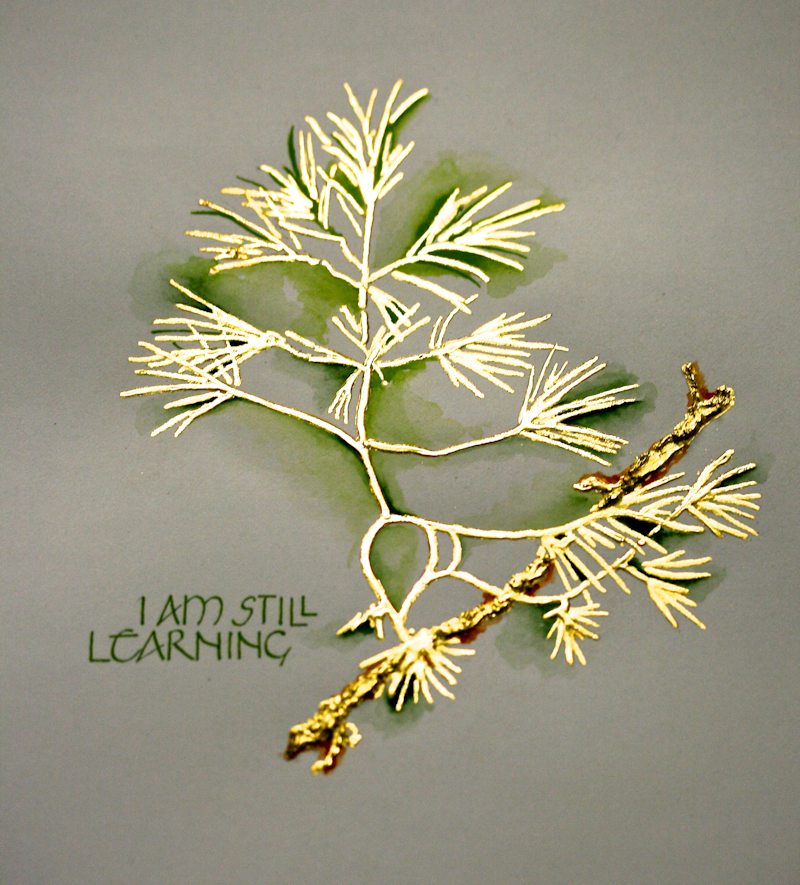
This work was done by Eileen McAllister last year for Variations on Romans. In her own words:
|
I did this piece in response to the #1
Homework assignment form the 3rd session of 26 Seeds, June
16-17, 2012 in Boston. The assignment was to gild a symbol,
image, word, phrase or quote, paint in a background behind the
gilding and use at least one Roman cap variation. I chose to use a drawing I had done of a pine branch. I copied it out of my sketchbook onto 90# Arches hot press watercolor paper using my standard HP inkjet printer on a light setting. With the image transferred onto my good paper, I spray fixed it and decided I wanted to work with 3 depths of gold. For the thickest branch, I laid a base of Golden Extra Heavy Gel Molding Paste followed by instacol when dry. (The Golden Molding Paste is what Reggie gave us as our sculptural gilding base in class.) I used a toothpick to apply and manipulate the paste to simulate the texture of the bark. For the thinner branches and some of the needles, I used “pinkified” gesso followed by instacol when dry, and for the remainder of the needles I used instacol only. I divided the image into smaller quadrants so I could work with the instacol and gold in stages. |
I used 23K patent gold in multiple layers. For the thicker
branch, I used little remnants of gold for later layers in areas
that broke up because of the sharp edges I had created.
discovered that with careful application and patience I could
cover even the rough areas well and feel frugal! After all the gold was laid, I painted around some of the image with the spring green color Reggie told us about—a gouache combination of white, oxide of chromium and lemon yellow, along with burnt sienna along the branch length. The Roman variation I chose for the quote on the left side is Neugebauer and I lettered that in the same spring green color. I think I used a snipped and honed EF66 nib for it, but I may have used a very small Mitchell nib. I really enjoyed using one of my drawings as a jumping off point for the gilding. I am excited about integrating what I've learned in Reggie's class with some of work I've done in the past. Trying to marshal and improve all these skills is both a challenge and a joy! Thank you, Reggie, for opening so many possibilities for us! |
* * * * * * * *
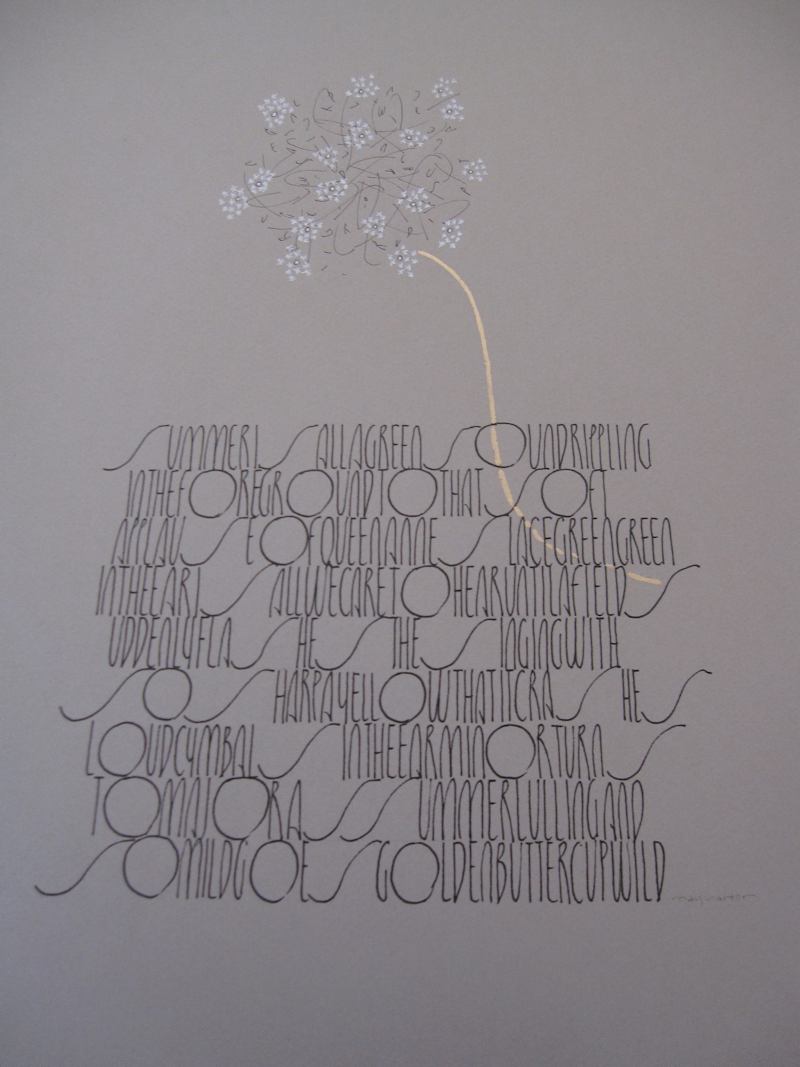
This work was done by Nancy Gilligan in Boston last year for the third session of “26 Seeds: a Year to Grow”. In her own words:
|
This May Sarton poem was completed as
an assignment for Roman Variations, 26 Seeds 2012.
I love Akim. When I came across another example of Burgert- letters in Reggie's handouts my fingers were itching to get to know them. I love their illegible quality and the texture they create on the page. Given that the S's and O's are its distinguishing forms, I scoured my quotes for one with an abundance of them. I think that these letters, like Akim, seem best written with a simple mono-line tool, - ballpoint pen, pencil, Micron. This quote is about summer - the greenness of the landscape, the white frothiness of Queen Anne's Lace and being wowed upon approaching a field of yellow buttercups. The visual "translation" of her words involve colors: blue (summer sky), white (Queen Anne's Lace), yellow (flowers), and green (field). Somehow, when moving from practice paper to good paper, I found myself with this very neutral colored, 19" x 14", piece of Canson Mi-Tientes. |
I lettered the poem with a black
Micron and was really pleased with the "field" I created. I
debated doing it again with color or adding color to what I had
done but decided differently when I realized that it was the
Queen Anne's Lace that interested me. I exploded some letters
and words from the poem, above my "field" and I liked the
texture and the shape of my "flower" but I needed the froth. I googled black and white images of Queen Anne's Lace and I chose as a solution to draw little x's with a white gel pen to give a feeling of froth and to make my flower white, like the real flower. Initially, I wasn't sure if the flower needed to be attached to the field and drew a very tentative stem, faintly with pencil, down into the text. I pondered this for a long time and realized that flower and field definitely needed to be connected for this to be complete but what should my stem look like and what media would be best? After more time and some great advice from Lois Rossiter - to consider repeating an element/shape already in the piece - my stem is an inverted S which I drew with a Speedball B-5 with Miniatum Ink and then gilded with Moon Gold. |
* * * * * * * * *
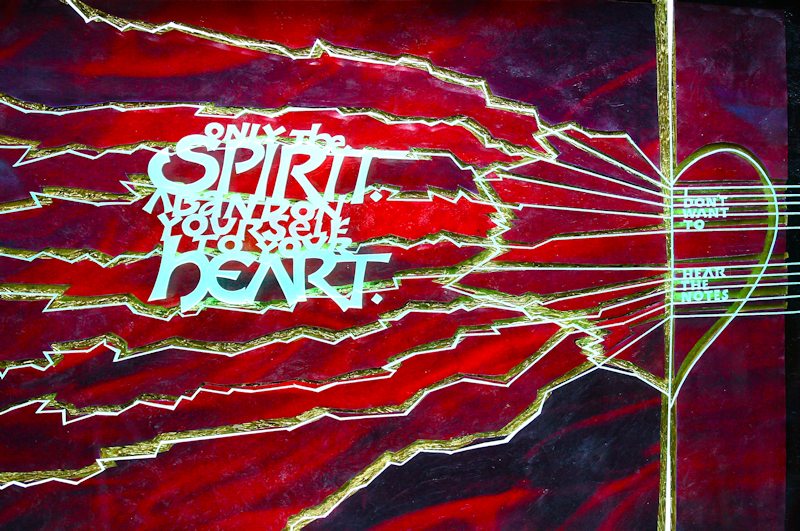
This work was done by Reggie Ezell in 2012.
|
Arturo Toscanini “I don’t want to hear the notes! Only the spirit! Abandon yourself to your heart. It is not enough to interpret the notes in front of your eyes. You have to look for it in yourself, not the music!” I had always loved Toscanini’s passionate conducting. When I heard him utter the words in this quote in a bio on PBS I knew some day I wanted to render them with the same energy with which he suffused his music. I made many starts over the years. Finally I was able to fuse into this single work elements I had experimented with separately for years. -Size: The scale of most calligraphic works is modest. There is a visceral response when confronted with a large looming object. -3D: I enjoy the chronological discoveries, observing the drama a work discloses when viewed from a variety of perspectives. -Gold: Gilding has long been my specialty, innovating with sculptural bases. The instant one gasps when light unexpectedly flashes off a surface is a potential moment of epiphany. -Light: Instead of reflected light, we have as a means of expression pure light itself. Emanating from the blasted fissures of glass, this is illumination speaking radiantly in a voice of our own age. |
My intentions in the design of this work: -The literal is transfigured into the symbolic; -Two dimensionality fragments into fissures of molten gold and sculpted light. The most transformative music is created when we abandon ourselves to our own vulnerability. size: 2 feet high, 3 feet wide, 4 inches deep Description: 2 panels in a shadowbox -front panel: plate glass sandblasted on both sides and edge lit with LED lighting -back panel: five books of 23 karat gold leaf on sculpted acrylic base; artist’s original digital images of stained glass panels manipulated in computer, then painted with acrylic glazes, paints, and extra heavy gloss gel; mounted on painted layers of museum board. |
* * * * * * * * * * * * * * * * * *
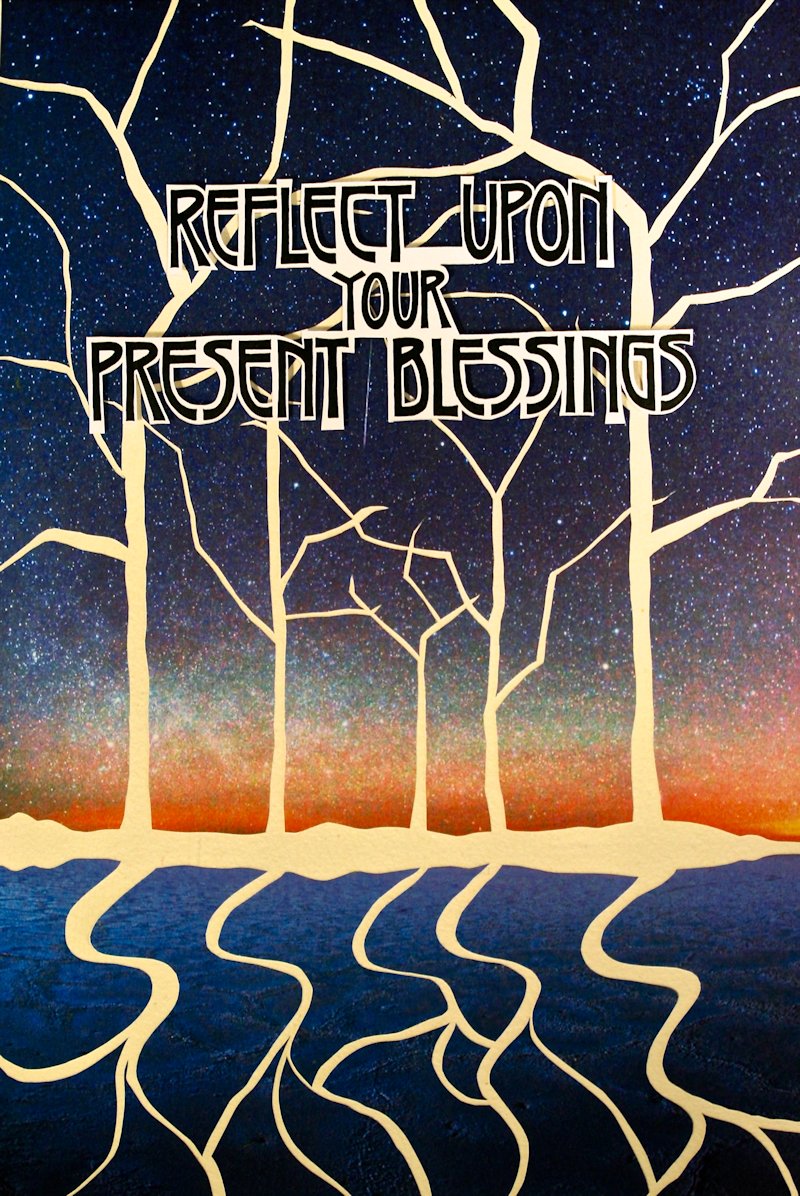
This work was done by Maria Turk in 2012 in Atlanta in the fifth session "DESIGN: Deconstructing the Grid" in PRIMITIVE TO MODERN. In her own words:
|
“Reflect Upon your Present Blessings” P2M class on Stained Glass Backgrounds - This was one of the most exciting classes for me! My mind raced with ideas for the homework assignment …I had already worked on a first layout with photos cut out and stuck down on black background (and once you start looking for photos it is easy to get carried away with ideas for more pieces). I was curious to “experiment” and work with a white background. I had sketched a small 3x5 winter tree design with colored pencil on black paper, and I decided it might look more like winter if the trees and branches were white…and how about using that white space to create their shape? Yes! Next I used some of the NASA free images and tweaked the colors in Adobe Photoshop. I saved the image on a flashdrive, and took it to the copy center for an 11x17 size print. My original rough design had been sketched on tracing paper, then I transferred the design on to the dark photo images using white Saral transfer paper. I cut out the shapes with an Exacto blade. Incidentally, I found that I could spray Stencil Magic Adhesive Spray by Delta on heavy papers to create the sticky background for the paper puzzle pieces. |
As the Christmas holidays were approaching, it was also on my
mind to turn this art into a Holiday Card, so that helped to
determine the quote I used. I had already been researching
period lettering styles from the Arts and Crafts era, and trying
out different styles with various quotes. This one pleased me. I
used B-nibs and Sumi ink, touched up letters with a black micron
marker, then made several copies in various sizes. Finally, I
made a transparency to lay over the artwork before making a
final decision. The layout is very symmetrical as is the final
design. The words were run onto cardstock, cut out and raised
with foam core strips for the final photo session. The original
photo shoot included small loose stars scattered on the artwork,
but of course, it is hard to bring all those separate elements
to class for the final review! The final artwork is an 11 x 17 Print. |
* * * * * * * * * * * * * * * * * *
This work was by Carol Hall in 2012 in Nashville from the fourth session “Foundational and Foundtional Variations” in 26 Seeds: a Year to Grow.
In her own words:
|
The week after Session 4 where Reggie
taught us the foundational hand, I was on an airplane from
Tucson to Denver and had a window seat. Well, I felt like a 5
year old with my nose pressed up against the window as I gazed
out in awe and wonder at the landscape. I got out my phone and
started taking pictures, especially focusing on areas that were
relatively untouched by people. I took over fifty shots by the
time we landed in Denver. I didn't know at the time what I was going to do with them, but it somehow occurred to me to make a book. (Maybe since that was one of our homework assignments.) I had never attempted a book before, and so I was excited for the challenge, and so inspired by the photographs. I narrowed it down to 18 pictures, 9 two-page spreads, plus the front and back covers. I had them printed on 8 1/2 x 11 Ink-jet cotton rag paper, that was heavier than I expected. Then I cut them down to 6 1/2 x 10 1/2, making them a full page bleed. |
I found a lovely quote byAbraham Joshua Herschel that fit
perfectly with the length and subject matter of the book. After
spray-fixing each page several times, I lettered on the right
hand page of each spread so that one could experience the
expanse of the landscape. I used a pale yellow gouache. After that I scored the pages so that the book could lay open flat, made holes with an awl for the linen thread to go through for the binding, and did the simple Japanese binding that Reggie showed us in class. I used some interesting rice papers for the front and back end papers, and made a title page and a colophon page. These pages were lettered in Red Ochre. The title of the book is: "Tucson to Denver: A Journey in Pictures from 35,000 Feet." It is 10 1/2" x 6 1/2" closed, and 21" x 6 1/2" open. |
* * * * * * * * * * *
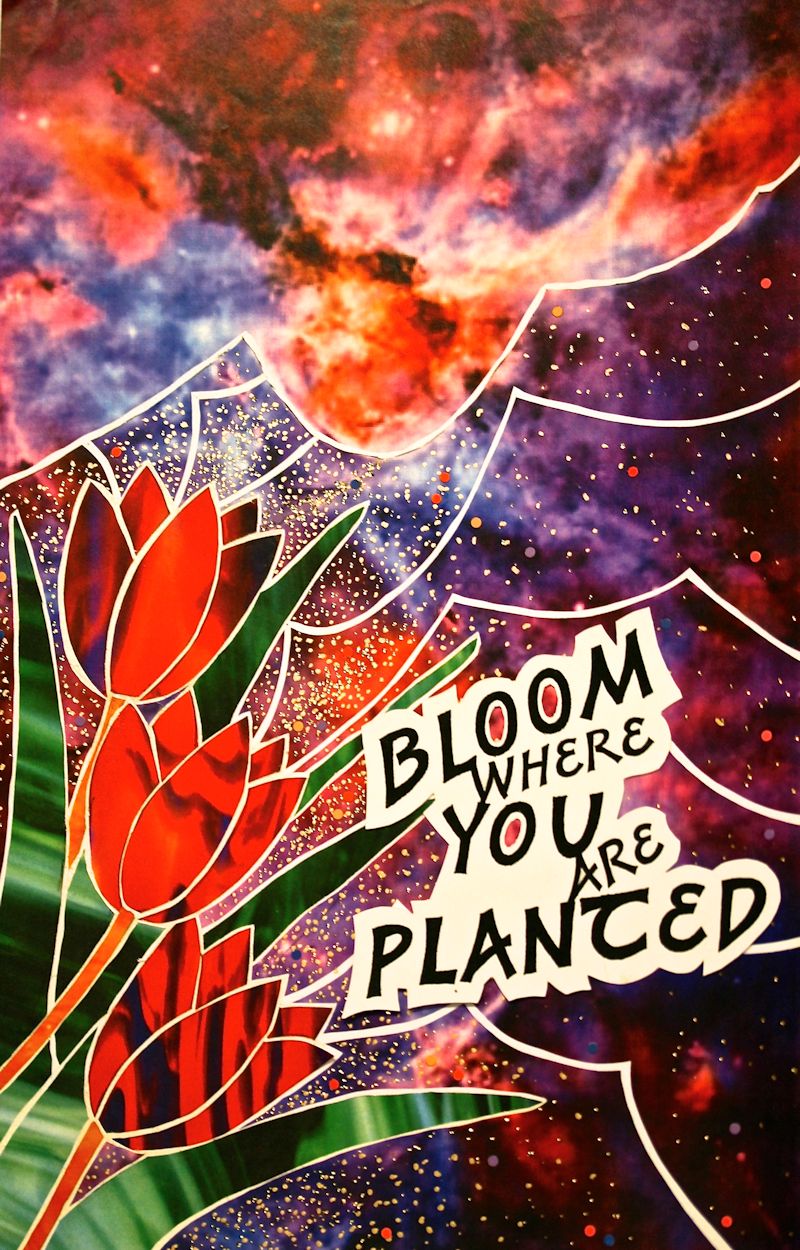
This work was done by Meshelle Callahan in 2012 in Atlanta in the fifth session "DESIGN: Deconstructing the Grid" in PRIMITIVE TO MODERN. In her own words:
|
I must have been daydreaming about or
missing my home state of Colorado when planning and working on
this piece as so many elements of it relate back to Colorado. This is an 11 x 17 homework piece I did for Reggie’s Primitive to Modern 5th month class held in Atlanta (my current home ). The instruction and in-class process was so inspiring that I ended up with three completed works for the next session. Yes, I will say that it can be an addictive process, especially when you start the weekend off with a delightful buffet style assortment of stained glass and hubbel background images to choose from. One background especially caught my eye as it reminded me of one of those explosive Colorado sunsets illuminating over the Rocky Mountains. I lettered the quote with a B3 Speedball nib using sumi ink. The edges of the letters were then sharpened with a Pentel Hybrid Technica Pen. Using transparencies I was able to rearrange the words in various ways and sizes to my liking. With the design process rolling in thought, using an exacto, I cut along a few of the contours in this specific background with the intent of creating an abstract mountain feel. Using scraps of paper backgrounds from other projects, I worked on using a color scheme for the tulips that would make them stand out from this already very busy background. |
The quote is a favorite of mine being
very simple and powerful. I saw the tulips being a good fit to
use with this quote because of their beauty and simplicity. I
have a memory of these crazy tulips that would pop up every
spring for years at my parent’s home in Colorado. To me they
represented this incredible strength and mystery. They came up
year after year even though the area where they grew was
continually dug up by animals, invaded by kids playing, and re
landscaped multiple times. The mystery being that two of the
tulips appeared out of nowhere the spring after two family
members passed away. The third tulip followed years later when
another close person passed. Pretty crazy!
Eventually, I topped off the piece with gold. LOTS of gold dots using my favorite tool right now, the hot foil pen! I punched out dots of colored paper to add a little randomness to the mix. What a blast I had with the process and I am thankful for the wealth of knowledge I gained from a fantastic Instructor! |
* * * * * * * * * *
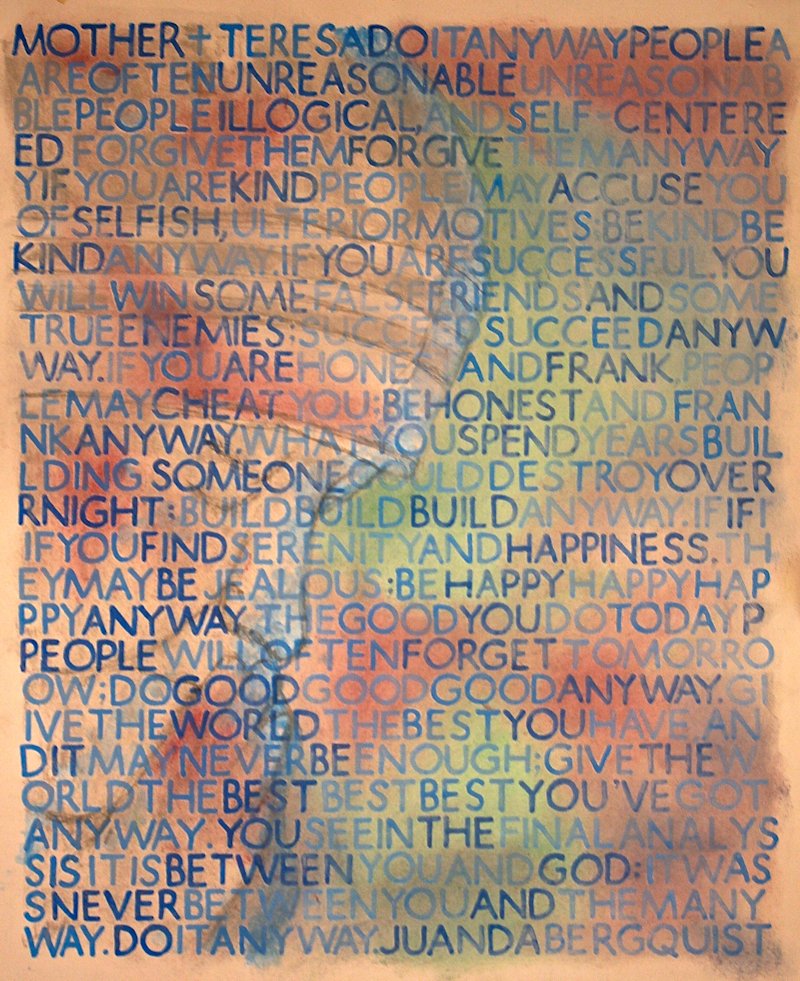
This work was done by Juanda Bergquist-Powell in Austin Texas this year for the first session, Roman Capitals in 26 Seeds: a Year to Grow. In her own words:
|
I intellectually approached the piece
as an “exercise’ to make myself spend week-after-week with (the
B-2 Speedball and Winsor & Newton gouache) tools that did not
make a good first impression on me. I read the poem several
times, enjoyed what she had to say, but didn’t seem to connect
emotionally or spiritually with the words (I suppose this is
akin to working on a piece by any client). My first 3 or 4 layouts were on the computer and printed on legal paper on my ink jet, so that I could consider words that hyphenated into undesirable widows or orphans and how to emphasize parts of the poem by taking the liberty to repeat choice words. I first penciled guidelines on the Arches 140 lb. Text Wove, penciled all the poetry to catch any spelling errors, inked over all the penciled words with a blue fine tip Sharpie so that I could electric erase all the guide lines quickly and without FEAR of what could happen if I had already gouached the lettering. Little did I know that I would drip gouache and find spelling errors later. Yet, I had told myself, “first times are never flawless, so expect to make mistakes”. I spent a “time on task session” each day on 1 of the 3 values of gouache to make myself not rush. This was around week 3 on this project. |
Week 4 & 5 involved: deciding
primary blue best fit the attitude of the poem, realizing the
words, word spacing and color set a strong pattern leading
toward a background that should be subtle [and actually working
on the piece]. Therefore, I searched for images of the culture,
the country and city that Mother Teresa called home. I decided
that an orbital view of Calcutta would make a nice subtle
background so I enlarged it to the 14x18 size on the computer
and superimposed the text to visually get a feel for the
possibilities. This allowed me to see that the major body of water flowing through Calcutta was the profile of a face. So, I reluctantly decided to include Mother Teresa in profile using graphite, Prisma color gray Nupastel, conte and colored pastels. To me this symbolized her praying over Calcutta to this very moment. This allowed me to bond with the piece and involve my inner self -- yet I was out of time, so I had to stop. I can see myself doing this piece many more times, but using a different set of tools. In the future, I will begin the lettering in the middle of the piece so my inexperience is not so obvious at the beginning, try to strike a better integration between the calligraphy, the imagery, and work; making sure that visually there is a clear focus. I think, my biggest accomplishment was finishing the project despite the inner critic. |
* * * * * * * * * * * *
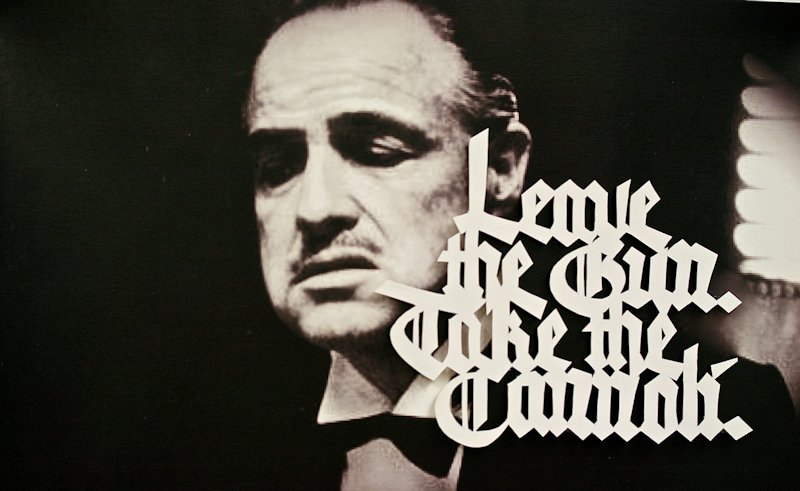
This work was done by Carol Hall in Nashville this year for the first session, "Blackletter: Modernizing a Traditiona , in 26 Seeds: a Year to Grow. In her own words:
| This piece was done for Session 1 homework in the Primitive to Modern class. The assignment was to do a modernized version of black letter by changing the style and/or color. I was inspired by the work of Guillermo Rodriguez-Benitez. I noticed his spirited style in many subsequent works I have come across since then. But I was especially drawn to the lettering that was completely connected and cut out of one piece of paper. I wanted to do this for my 21-year-old son, Drew, this being his favorite quote from The Godfather: "Leave the gun. Take the cannoli." (I love Drew's sense of humor!) | I found the exact image I wanted to use of Don Corleone and printed it on bristol stock. I did the lettering and had to spend a good deal of time arranging the words to get the connections I wanted. I decided to capitalize "Gun" and "Cannoli" to bring some interesting breaks into the black letter forms. Once I had everything positioned satisfactorily, I traced it onto white bristol stock, and set to cutting out the shape with an exacto knife. I mounted the lettering with very narrow strips of black foam board glued with rubber cement, so it is significantly raised from the photograph. Size: 11 x 15 |
* * * * * * * * * * * * *
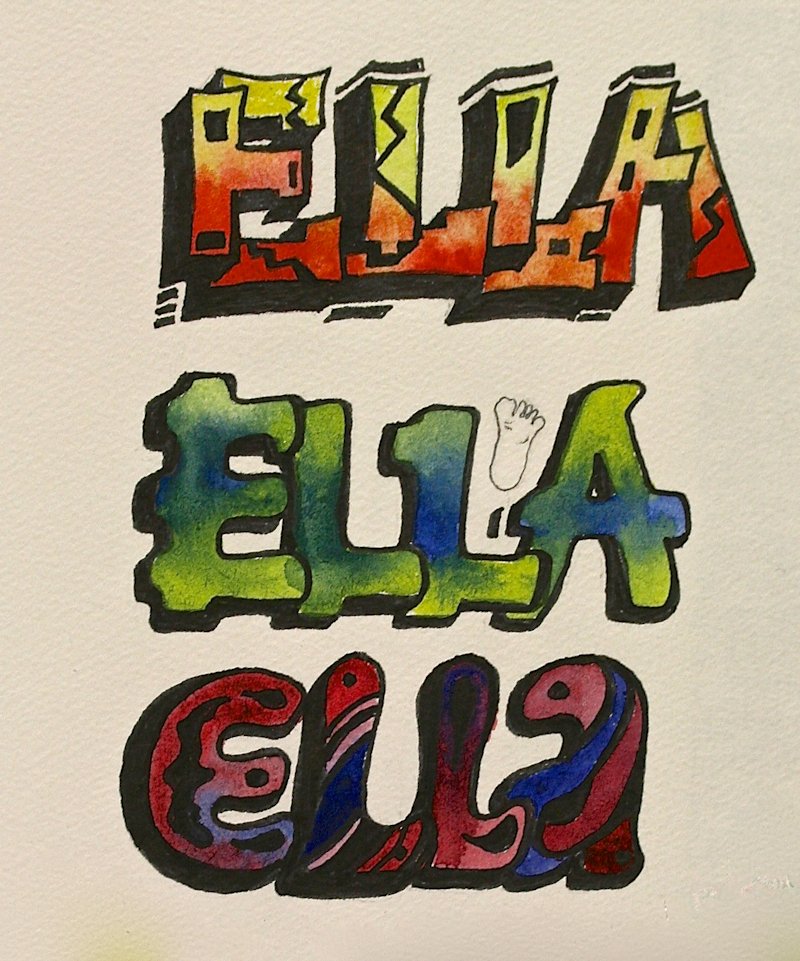
This work was done by Leslie Winakur in San Antonio (not exactly) for the first session this year, "Roman Capitals: Monoline and Broad Edge", in 26 Seeds: a Year to Grow. After three years of taking my Year Long Courses she simply did what she wanted to! In her own words:
|
I've loved graffiti lettering art ever
since I first saw it on trains in New York City and
Philadelphia. Recently I've been reading more about graffiti
artists and studying their lettering in books. So I
decided I would like to try some, and then I decided to teach a
little 2 hour workshop about these fascinating letter forms.
Meanwhile, our year long 26 Seeds class with Reggie began in
February, and he assigned the now traditional first assignments
using monoline and pen drawn Roman caps. But life intervened,
and my daughter's pregnancy became complicated, so I left to be with her early on day 2 of our first class and ended up with very little time for anything, least of all homework, over the next two months. However, at the end of that time, Ella was born, six weeks early, beautiful and feisty! |
There's not much to do in a hospital room or lounge, and
calligraphy is my escape, so I started doodling graffiti style
letters, to practice for the class I'm teaching in a few days.
I'd been reading that one of the primary messages of graffiti
art is, "I am here!" And that seemed the perfect message from
tiny Ella. It wasn't exactly the homework assignment, even
though Ella is not the easiest name to space, no matter what
kind of letters are used, but these versions of her name are
both literally and figuratively the sum total of my emotional
and artistic efforts over the past weeks. The letters were first drawn in pencil, then inked over the pencil with a Prismacolor Premier black marker, and then colored with my portable Schmincke watercolor palette, to somewhat simulate the airbrushed effect of spray painted letters. |
* * * * * * * * * * * * * * * *
This work was done by Maggie Gillikin in San Antonio this year for the first session,
"Roman Capital: Monoline and Broad Edge", in 26 Seeds: a Year to Grow. In her own words:
|
These pages are part of a hard bound
pamphlet stitch book that I constructed for the first Reggie
class homework assignment. I used a Brause B nib, size ¾ for the
finer lines, and size 2 for the broader lines, white gouache,
black Parker Quink ink,and Schiller paper.
My goal was to use very few supplies, three alphabet sentences, and the alphabet itself to express ideas of contrast and harmony. |
After making marks and letterforms, I moistened the dried ink
with water and dragged the ink away from the letters. This created beautiful gradations of color in gray, blue, brown, and yellow. I love the way this particular ink breaks down into a fabulous variety of color, and I love that aspect of this bottled fountain pen ink. Size: 5” x 5” |
* * * * * * * * * * *
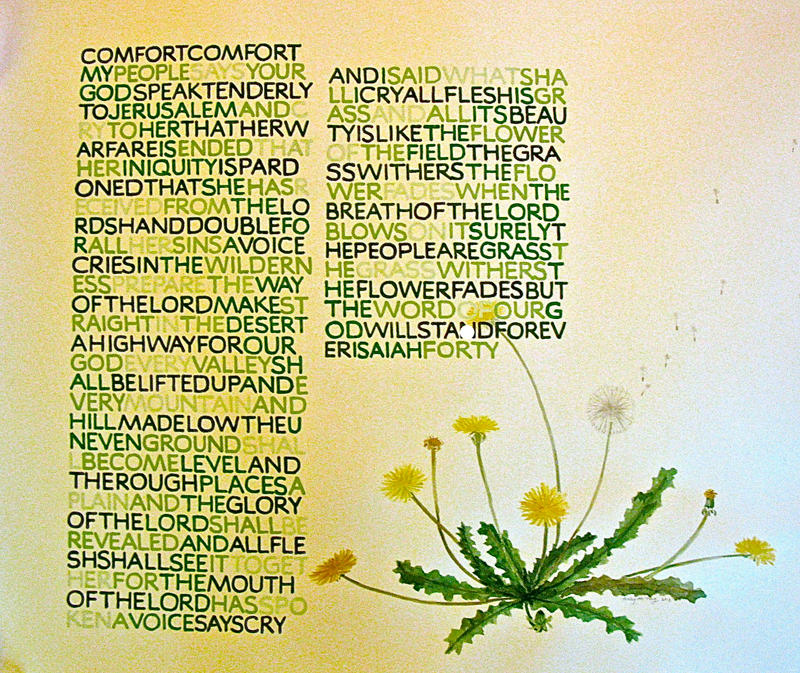
This work was done by Haley Ping in San Antonio this year for the first session Roman Capitals: Monoline and Broad Edge , in 26 Seeds: a Year to Grow. In her own words:
|
This assignment was quite daunting to
me having to work so large and change values every word. What if
I made a mistake! Plus, it was so contemporary looking, not my
usual style at all. I approached the piece as an exercise hoping
it would turn out well enough to frame and enter into the San
Antonio Guild’s spring show since they wanted large pieces. Two
birds with one stone, if you will.
After typing the text into the computer with a similar sans serif font in similar values, I tried various column width possibilities. Once I found the width I liked, I hand lettered it on to grid in the correct size and the column width I liked to see length for spacing. Next, I cut it up and played with page orientation and columns. I ended up deciding to do two columns of text with a watercolor dandelion to bring more of my personal style into the piece. |
After I had the layout, I put it off
and put it off trying to find a whole day to devote to just the
lettering, quite difficult when I homeschool my son. I finally
just bit the bullet and started one day knowing I could ask my
husband to take my son to piano lessons that afternoon. I
grabbed every moment I could that day to letter.
The dandelion was more challenging than I thought it would be. It just didn’t look right at first, very separate from the lettering and the whole piece was a little unbalanced. During the class critique I got a few suggestions of how to link the two better. It ended up looking best to paint in a few more flowers, particularly the one behind the text. The end result is more pleasing and now I have my piece for the guild’s spring show! |
* * * * * * * * * *
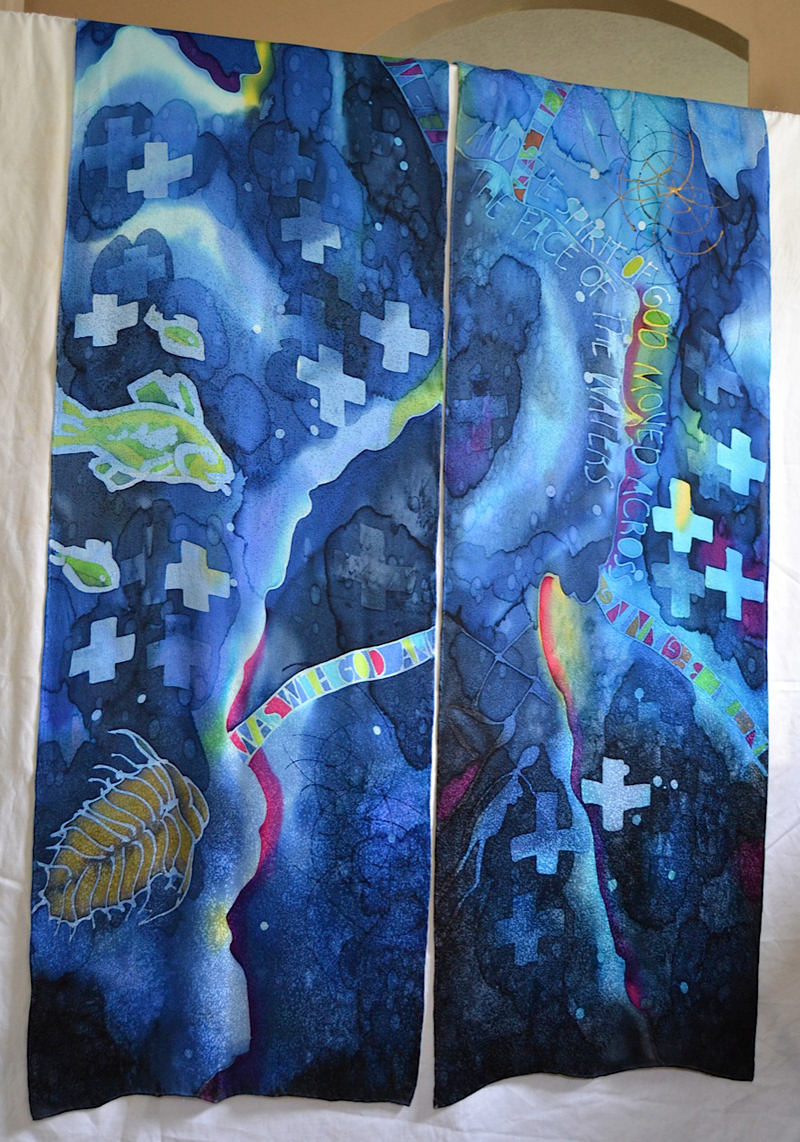
This work was done by Kim Dixon in Kalamazoo in 2009 in PRIMITIVE TO MODERN. In her own words:
|
The baldacchino for St. Catherine of Siena in Portage, Michigan
were begun while I was taking Reggie’s Primitive to Modern
class. Though it was not actually an assignment in class, class
did seep into the project. This was a collaborative project with
Karen Vosburg who was a student of Reggie’s in the year long
class. The photos here are of the prototype of the baldacchino. The finished piece is 2 banners that are approximately 26’ long by 48” wide each. They reach from the entrance of the church to the baptismal pool. They tell the story of the Bible from Chaos to the Baptism. The prototypes are done on 4 white blank scarves of jacquard silk approximately 15” x 72”. They are stretched taut on frames much like canvas. The lines and monoline text are done with gutta, a petroleum based latex product from rubber trees. It is applied with a metal tipped applicator bottle. The color is an alcohol based dye that is applied with brushes. You work in reverse so that the lightest color is the first color down. There are any where from 2 to 5 layers of color depending on depth of color and effect. |
The thicker lines, pagan crosses and spatters where done
with hot wax applied with brushes, sponge brushes and Tjanting
tool. In some areas, salt was applied while the fabric was still
wet for special effects. The helical DNA patterns where done
with compass with a ruling writer attachment. the final pieces
are steam set for 3 hours, rinsed and dry cleaned to remove all
residue. The jump to the actual pieces was a logistical challenge. All the processes mentioned above where used but bumped up a few notches. Brushes became mops, dye was mixed in tubs, the compass became pie plates. We had to rent studio space because neither of our homes could handle the size or the disruption for a year. As we hit each challenge things just seemed to work out. Necessity is the Mother of invention and this project took that to the bank. This is a really condensed story of the baldachino. Many people were involved in its inception, consultation, creation and it’s installation. It is filled with symbolism, inclusion and emotion, perhaps some blood, sweat and tears as well. It was a excellent adventure I will always remember with fond memories. It still hangs at St. Catherine of Siena in Portage, Michigan. So if you happen to be in Kalamazoo or Portage, ya’ll stop by and check it out. |
* * * * * * * * * * * * * * * * *
This work was done by Carol Hall In Nashville this year for the first session, "BLACKLETTER: How to Modernize a Traditional Calligraphic Hand" in PRIMITIVE TO MODERN. In her own words:
|
For Month 1 homework assignment: The inspiration came from the
name of the typeface that Reggie coined "Chatter." What came to mind was the chatter that goes on inside my head sometimes and portrayed that with the black lettering in a constant flow. |
The black letters are overlapped by the bold but softened edges
of Textura in red, symbolically interrupting these "chatter"
thoughts with what I feel to be the truth. Black gouache and Cadmium Red #2 dry pigment on Arches w/c hot press 90#. 11x17 |
* * * * * * * * * * * *
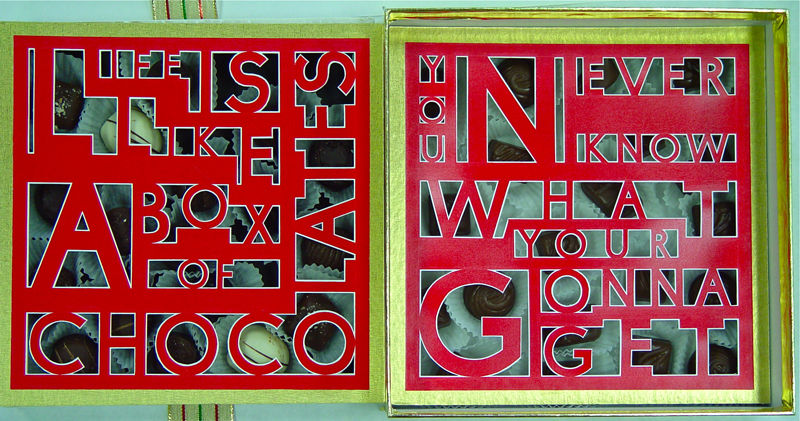
This work was done by Dave Cook in 2002 for ”Roman Caps: Pen Manipulation” in
26 Seeds: a Year to Grow. In his own words:
|
The piece was inspired by a piece
that Diana Ludwig did in our 1995 class. She had done the grid
locked caps to make the word CHOCOLATE with chocolate wrappers
show in the background in the counter spaces. When we had your
2002 class in New York I had see the movie Forrest Gump and knew
then I had to do the box of chocolates. I had created my roman caps and made copies at different sizes and played around with the words to grid lock them into a square shape. I used both phrases from the movie….'Life is like a box of chocolates' and 'You never know what your gonna get' as I knew I had to have two layers of chocolates. Once I had the layout I looked for a square box I could use….preferably a chocolate box. Didn't have much luck finding anything that would fit the bill but found one that had toiletries in it. Took the toiletries out and covered the box with gold wrapping paper. On the lid I glued the word LIFE that I had cut from card stock and then wrapped the lid with gold wrapping paper. Using my finger I ran it over the lid to make the LIFE letters stand out as if they had been embossed onto the lid. I cut two pieces of gold matt board to fit inside the box. I then took the two phrases to Kinkos and had them print in red from the black letters onto card stock about 3/8" less than the size of the matt board(to give a gold boarder around the letters). The next step was to cut out the counters and glue them to the matt board. |
In the box I had to add a piece of cardboard half the depth of
the box from the bottom of the box so the first phrase would sit
on it rather than the chocolates. Added the chocolates for the
first layer and then added the first phrase. I created another
tray from cardboard for the top layer and added the chocolates
and the matt board on top of that adding broad ribbon underneath
the tray so that the top tray could be lifted out to show the
bottom tray. It was worth all that effort to see the faces of
the rest of the class when I opened the box of "LIFE" a real
Kodak moment. Looking back at all my efforts I should have found a box before doing the grid lock as I was working with a square box theme…..not many square chocolate boxes out there. As things turned, out our dog Turbo found the box of chocolates in my study a couple of years later and destroyed the top layer of the box and ate the chocolates. Still have the original top card "You never know what your gonna get"……how ironic. |
* * * * * * * * * * *
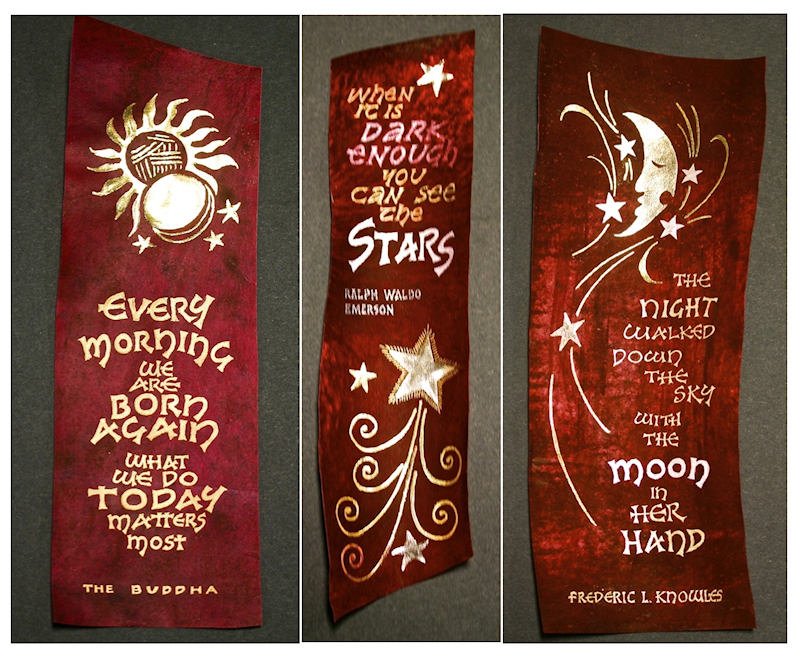
This work was done by Maria Turk in Atlanta in 2012 for the fourth session of PRIMITIVE TO MODERN.
In her own words:
|
(A)“Every morning we are born again –
What we do today matters most” ~ The Buddha – 9” x 3” (B)“When it is dark enough you can see the stars” ~ Ralph Waldo Emerson – 8” x 2 ½” (C)“The night walked down the sky with the moon in her hand” ~ Frederic L. Knowles – 9” x 3 ½” I produced these three works simultaneously in the 2012 P2M course. They are all on Purple vellum – (A)’s vellum was provided in class, (B) and (C) were the result of an at home Brazilwood dye making party. We originally formed a group earlier in the year and step by step simmered the Brazilwood shavings according to the procedures suggested in Reggie’s notes. We made two batches, and this allowed everyone in the group to have plenty of purple dye to work with. I spent a second day dying my prepared vellum according to the steps suggested. I died 3 pieces, and used the 2 smaller ones. All lettering was done with several sizes of B nibs and EF66. |
The designs were transferred with the
white Fons & Porter pencil, using a light table and tracing. I
had played with several designs and quotes ahead of time, so I
picked a few that seemed to work together as a triptych. In an
experimental mood, I wanted to try lettering and gilding using
various gold paints I had been collecting the last few years, as
well as an assortment of scraps from the gilding lessons the
previous year. (A) “EVERY MORNING…” Sun, Moon and stars were gilded in 23 karat Gold leaf, lettering was Winsor & Newton Gold Gouache; (B)”…DARK ENOUGH…” the stars and strokes below stars are White Gold, Palladium, Lemon Gold, 23 karat Gold Leaf, Variegated Gold – the lettering was done with different shimmering colors from a Yasutomo paint palette - these were somewhat unstable and difficult to work with; (C) “THE NIGHT WALKED…”was an experiment with Moon Gold gilded for the moon, Palladium for the stars and Fine Tec M600 for the lettering. In summary, I found the purple vellum most delightful to work on – the white pencil easily erased with the black Factus eraser. Call me an “over achiever” if you want…but the plain truth is that I was just having too much fun! |
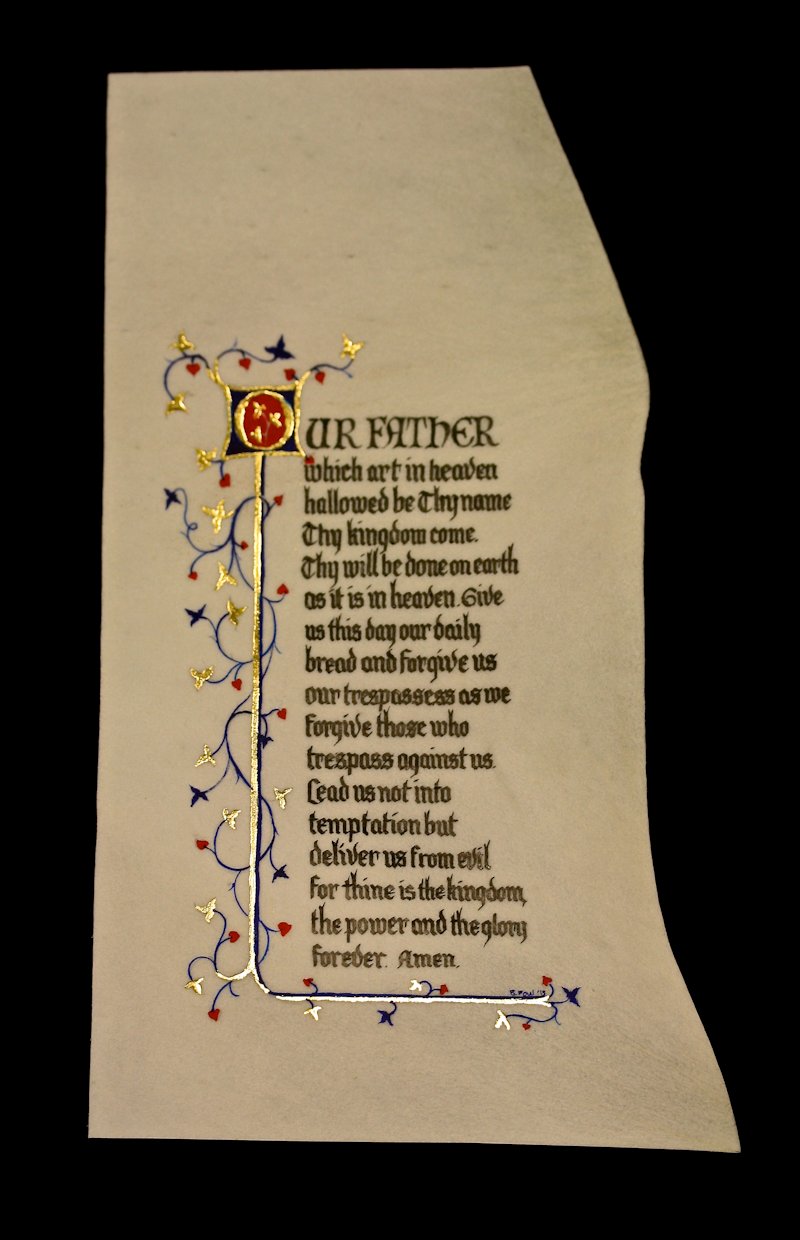
This work was done by Beth Paul in Nashville this year for the second session “Writing on Vellum” in PRIMITIVE TO MODERN. In her own words:
|
Our homework assignment was writing on
vellum. I liked the idea of doing a manuscript book but I had
never made one before. After spending hours studying reference
books on medieval manuscripts, I decided to make my version of a
miniature book of hours with prayers that I learned as a child.
Since I basically had one day to do this, Memorial Day, I wanted
to do text that was familiar. Well, that whole book plan changed about the time I realized I was dealing with small spaces and long words like “temptation” and “trespasses”. That decision went out the window almost as fast as the idea of using Carolingian for the text. The piece of vellum I had started with was 4”x7” and the others were not any bigger so using textura was basically my only option unless I started paraphrasing. I started working the layout on graph paper with a Mitchell size 4 broad edge (no reservoir) but immediately got the idea that was too big and switched to a size 5. Coincidently, I found a 3mm guide line transparency in my class handouts that worked perfectly on my light box so I didn’t have to draw any guidelines on the vellum. I took that as a sign I was on the right track. I left out the capital letters, thinking I would do them later in color but I didn’t like the effect of that so I went back and inked them in black. I took a deep breath and started on the vellum, keeping the text flush left. Some of the lines were adjusted as I went and the Amen ended up on the last line of text instead of by itself but like listening to a long winded preacher, I was just glad to get to the Amen at all. I was using Sumi ink because I really like the darkness and consistency of the flow even during the challenge round (try writing a gothic “s” four times in one word 3mm high and see if you don’t think about getting a thesaurus). The fact that the Sumi was already sitting on my table was another sign! My next biggest decision was the title. I first wrote “Our Father” in matching textura on graph paper but didn’t like it. I then tried writing it with split lines, thinking I would fill in with gold leaf but that didn’t work for me either. Taking another look through the references, I really liked how the versal letters were sometimes used to fill up first lines of text so I drew them in pencil. I colored them in using red and blue, decided against that. To get rid of the colors, I blacked them all in and that felt just right. I lined the title up with the text using the light box and inked in the main parts with a Mitchell 6. I went back then and touched up all the letters with a Hunt 66. |
I had played with the placement of
“Our Father” and really liked the O being out by itself. Or at
least I did until I came to the realization that I had a long
margin that needed something. That’s when I went back to the
reference books and saw that the capital letter was always
indented throughout history, no exceptions. Always! I had just
broken a thousand years’ rule. It wasn’t even noon yet.
I had already decided to gild the initial but I had to do something with that mile wide margin. I went ahead and drew a box around the initial, thinking that would lead me to an answer which it did. My next idea was to draw a box around the whole text so I drew double lines down the left side and across the bottom. Both the text and vellum had an uneven edge so I thought twice about putting a straight line on the right. One of the reference books I used had a manuscript with vines wrapped around a border so I decided I would try that. Since I was working on the vellum itself at this point, I really didn’t leave myself any room for second guessing. I lightly drew in the vines and leaves, just enough to see where the gilding should go. So far, so good. I decided to go for it. I used Instacol for the base and filled it in with the smallest brush I could find. I basically just started putting Instacol where I thought some gold would look good then let the Instacol dry. Since the areas being gilded were small, I used the 23k gold leaf left over from class to gild the initial, lines and some of the leaves on the vines. I had already played with red and blue watercolors so I decided to use both for some color. Earlier, I had mixed alizarin crimson and cad red (I have no idea why) and it had a nice, bright color which I liked so I painted the inside of the initial and little hearts on the vines (they didn’t start out as heart shapes but somehow they morphed). For the blue, I chose to use Windsor Blue just because I love the color. I got carried away and painted a blue line next to the gilded line with a brush (too bad I didn’t have a ruling pen handy but I have one now!). I liked the way the piece looked so I signed it and quit before I went too far. The finished piece itself measures exactly 3”x5” which I could not have done if I had tried to plan it that way. Postscript: It wasn’t until I saw the photo of this piece that something caught my eye and when I checked my roughs, sure enough, there it was, a misspelled word. I was so traumatized I had to wait a few days before I could bring myself to do anything about it. It was scary to do but I took a #10 blade (the curved one) and I scraped off the mistake. Since textura has such tight spacing, I had to also remove two more words (gasp! I know but they were small…) or there would be a gap. I wasn’t exactly sure if I was supposed to or not but I felt like I needed to use the sandpaper as my scraping seemed a little bit too enthusiastic. I took a piece of 400 sandpaper and used the corner to sand the area. I felt like I was trying to put a diaper on a gnat, it was such a small area. I took some glassine and burnished the area thoroughly and then used what seemed like half a jar of gum sandarac. I dug out my Mitchell 5 and carefully lettered the missing words. After the Sumi dried and I dusted the sandarac off, it still looked a little bit lighter than the other text so I used a Hunt 66 to add more ink to the strokes. Hopefully, no one will notice there was ever a correction. I’m not telling! |
* * * * * * * * * *
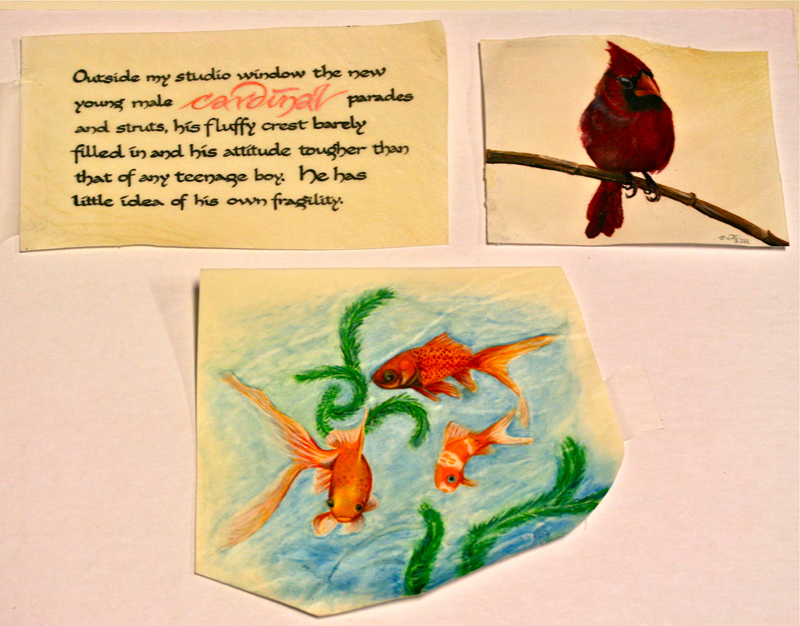
This work was done by Victoria Lansford in Atlanta in 2012 for the fourth session “Illumination on Vellum” of PRIMITIVE TO MODERN. In her own words:
|
Urban Wildlife Ever since I saw an exhibit of Middle Eastern and Indian illuminated manuscripts in the early 90's at the Smithsonian, I have wanted to paint and illuminate on vellum. The materials themselves seemed as magical and mysterious to me as the exquisite artwork itself. Thanks to Reggie, the materials and techniques are demystified! Reggie also introduced me to the wonderful miniatures of Kandy Vermeer Phillips and to the book he refers to as "the most beautiful book no one ever reads," Painting for Calligraphers by Marie Angel (it was already on my shelf, and yes, I too had only looked at the pictures). The book as planned is Urban Wildlife with micro stories and miniatures of the many animals in my backyard: the darting chipmunks, the fearless squirrels and opossum, the resident barn owl that is our evening soundtrack, the generations of cardinals I have watched since I bought my house in 1998, the decedents of the 25 cent feeder fish I put in the pond I dug shortly after, and other creatures that show nature will find a way even in the crush of life that is urban Atlanta. |
I chose the book format for the intimacy of experience and also
because I have loved the anthropomorphized animals in the books
of Beatrix Potter and Maurice Sendak for as long as I can
remember. I used small interestingly irregular pieces of vellum from Pergamena's 1lb bag of scraps deal. For the lettering I opted for Carolingian with black stick ink and Finetech gouache for the red text in my favorite of Reggie's variations. For the young cardinal I used watercolor and gouache. The fish and pond plants are the same, but for the water I used Derwent metallic watercolor pencils. They work beautifully on vellum to let the color of the skin show through while still laying down intense pigment. For both miniatures I used a pentel brush pen with the ring left on. This has become my favorite brush for anything detailed, including gilding. |
* * * * * * * * * * * * *
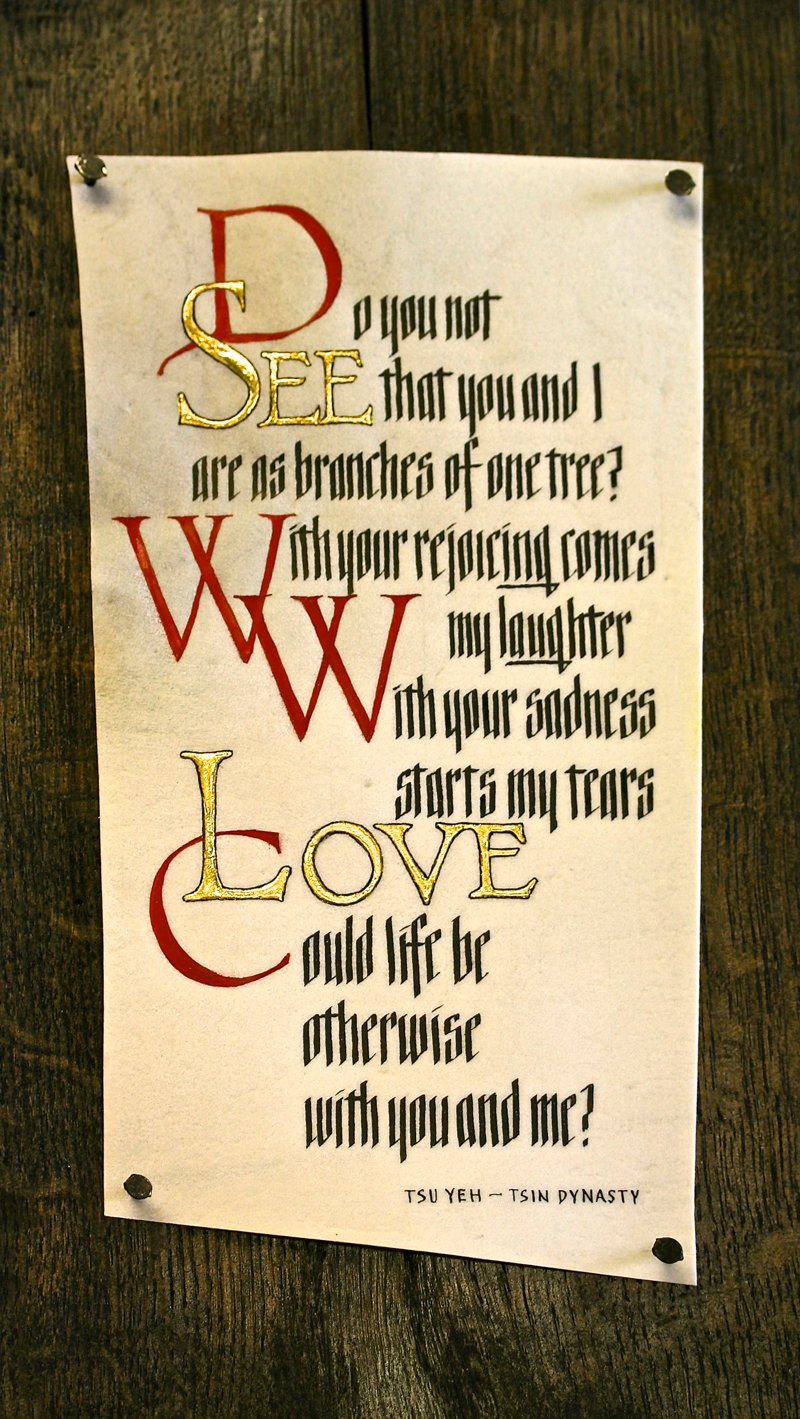
This work was done by Carol Hall this year in Nashville for the second session, “Writing on Vellum” in PRIMITIVE TO MODERN. In her own words:
|
Homework for Week 2, Primitive to Modern: Lettering, Color and
Gold on Vellum A couple of years ago, when I first read this poem by Tsu Yeh, I knew that I wanted to letter it and give it to my husband, Michael. In learning about vellum and the special organic qualities of it, I immediately wanted to use this material, and with our 30th anniversary approaching, everything converged into whatever is the opposite of a perfect storm. I loved Neugebauer's layout and lettering style in one of his pieces in The Mystic Art of Written Forms, and so I used it as well as I could with the words to this poem. After I completed the work, I struggled with how to mount it. In bed one night, a thought suddenly occurred to me, and I knew what I had to do. I also knew it wasn't going to be easy. |
When we bought our property where we built our home, there was a
large twin oak tree that we thought of as a symbol of the two of
us. A year ago, it fell, first one half and a few months later,
the other. (hopefully not a foreshadowing of things to come) My
son chain-sawed out a board and planed it down to the size I
needed. I then sanded, rubbed it with ebony stain, and sealed
it. I had in mind small nails that looked like spikes to nail
the vellum to the board. Much to my surprise, I found them at
Lowes...they're called 'cut tacks.' I was very pleased with the final product and so was Michael when I gave it to him for our anniversary, May 7th. Materials: Patent Gold leaf, black stick ink, Cad. Red #2 pigment on prepared vellum, mounted on wood. |
* * * * * * * * * * *
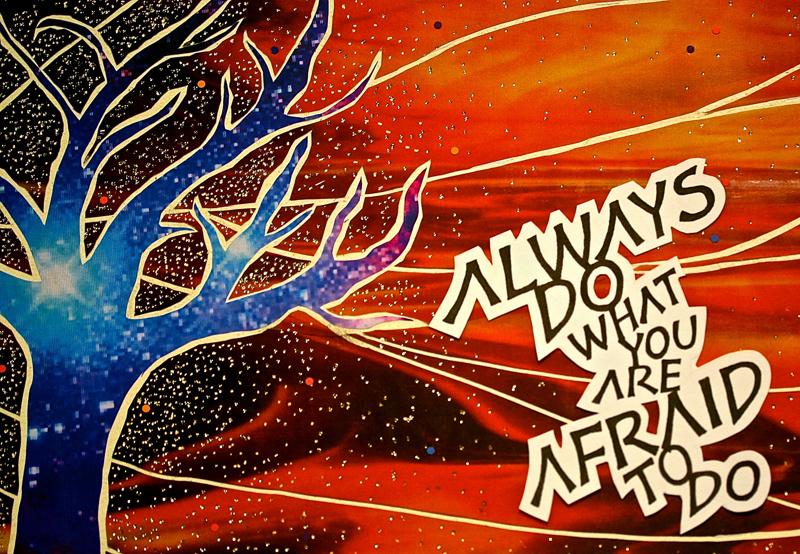
This work was done by Meshelle Callahan in Atlanta in 2012 for the fifth session “Design: Deconsructing the Grid” in PRIMITIVE TO MODERN. In her own words:
|
This 11 x 17 piece was created during the weekend class of
Reggie's Primitive to Modern course. "Always do what you are
afraid to do" was a fitting quote for this work. As I stared at
the blank slate in front of me, I admit that fear and hesitance
did surface. At times it can be intimidating and even fearsome
to begin a piece when so many ideas are floating in my head and
then being unsure of what to go with or how to successfully
create the envisioned ideas. Of course I wanted my first attempt at this newly learned design process to be successful. I had much to think about, many choices to be made, a new lettering hand to apply and of course my inner critic pushing my buttons the entire time! AND YES I did fear cutting up my beautiful paper backgrounds and winding up with a heaping mass of mangled scraps! I guess you could say that being afraid was trying to get the best of me. However, I was in good hands with excellent instruction and guidance from Reggie. |
I lettered the quote with a Speedball B3 nib using Moon Palace
sumi ink and a Pentel Hybrid Technica pen. After utilizing
transparencies in the design process, I was able to arrange the
words in various sizes to my liking. I used two different
decorative backgrounds chosen from the awesome assortment
brought in by Reggie for the weekend and I focused on using
backgrounds with a complimentary color scheme. I really do not have a reason for using a tree image in the design other than I did mess up during the paper cutting process and just turned my mistake into a tree! Lets just say that when it came time to use the hot foil pen, I was NOT afraid! I went a little crazy when I added gold dots to create movement in the piece. I would definitely add spacers between the background and lettering for the dimensional effect before being photographed - a tidbit by Reggie. I did not have spacers at the time this photo was taken but have since re taken the picture with spacers and it really makes a difference. Once again I learned a ton during this weekend and I am fortunate and grateful to have had Reggie's expertise and guidance turning any fears into enjoyment! |
* * * * * * * * * *
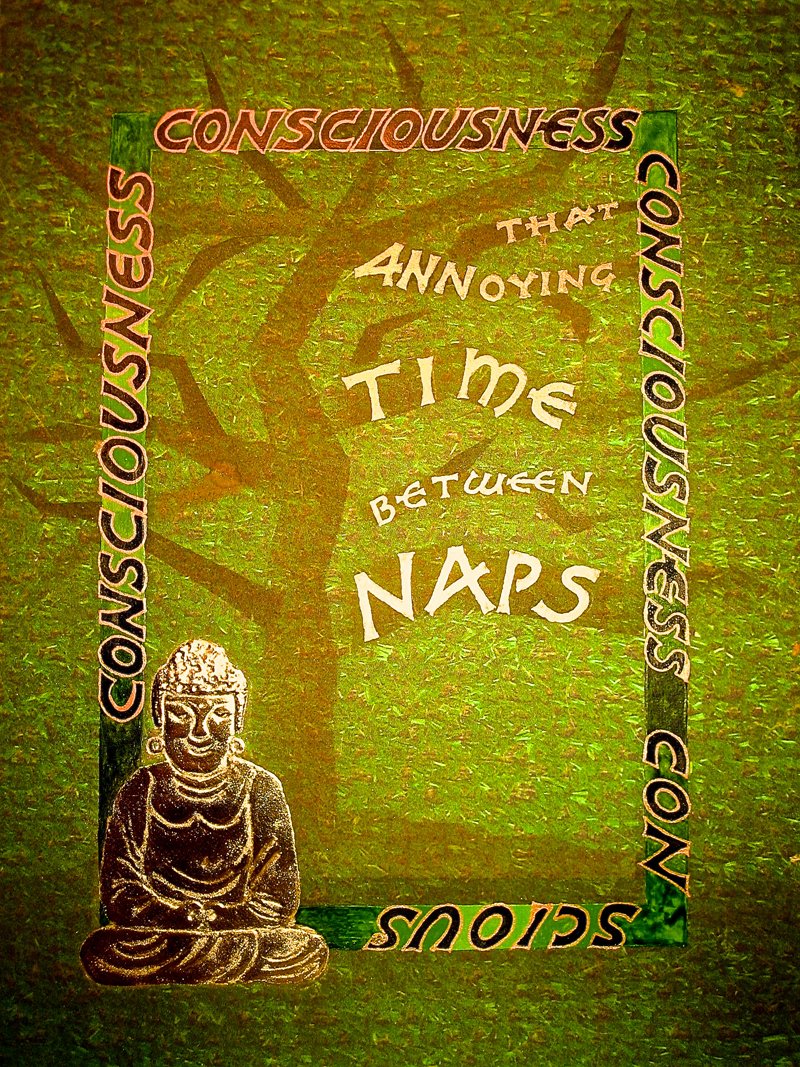
This work was done by Maria Turk in Atlanta in 2012 for the fourth session of PRIMITIVE TO MODERN.
In her own words:
| “Consciousness” This piece did double duty… as a homework assignment for Session 4 of the P2M class 2012 in Atlanta but also I had entered it into a juried exhibit called “Wink”. This exhibit was at the local art colony in Buford, Georgia where I live. The assignment was to create art that would make the viewer laugh, smile or be an inside joke. It was accepted and exhibited for 6 weeks! The original piece is 8 ½ “ x 11”. I copied an Astro turf carpet (artificial synthetic grass carpet) onto Diploma Parchment Paper using my ink jet printer to achieve the dark green textured background. It was then spray fixed and left to dry. I was inspired by a geometric tree design I saw that was printed on clear wrap when some flowers arrived from the store. I took that basic design and created stencils for the tree and branches at a scale that would work within the ½ inch border I would later transfer on. These branches would also break through the border to add more interest. I used pastel chalks on the stencils, then spray fixed. The branches were also to be my gestural strokes for the rest of the quote. |
The ½” border was transferred on to the paper with Saral and it
included the Buddha I had decided to use in the lower left
corner. I Google searched Buddha images until I found the one I
liked best and scaled him to fit the size I wanted. Then gesso
was painted on the border; lettering on the gesso was black sumi
ink with B-nibs. Next, 6 values of green were mixed using a
combination of watercolor and gouache - this is why some of the
counter spaces between letters are more opaque than others. It
was an accident combining watercolor and gouache, but I actually
liked the way it turned out! Finally, “Consciousness” was
outlined in W&N gold gouache, and also the gestural lettering in
the branches was done at this time with the gold gouache and
various B-nibs for the different size branches, fine tuning the
letters with the EF66 nib. Back to Buddha now…I wanted his hat and robe folds to stand out. Here I had to experiment a bit, and I actually had two separate Astro turf 8 ½ x 11 pieces I was making at the same time – one for experimentation…so I used sculpting base on his hat, then instacol over all, painting it thicker in some areas and thinner in others – hoping to create the creases. Then I carefully applied the 23 kt. Gold leaf to Buddha, pushing hard with the embossing tool at the creases. I didn’t win any ribbons at the show, but I did have to borrow it back mid-exhibit in order to present my homework to Reggie at the next class! |
* * * * * * * * * * * * * *
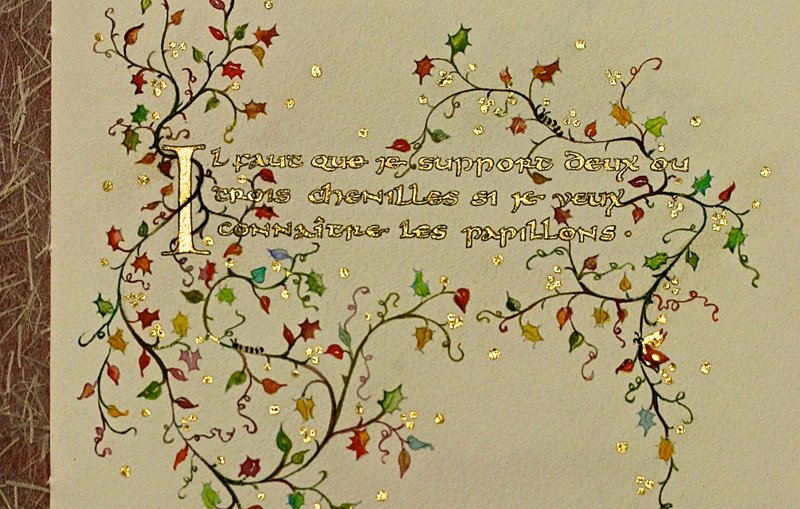
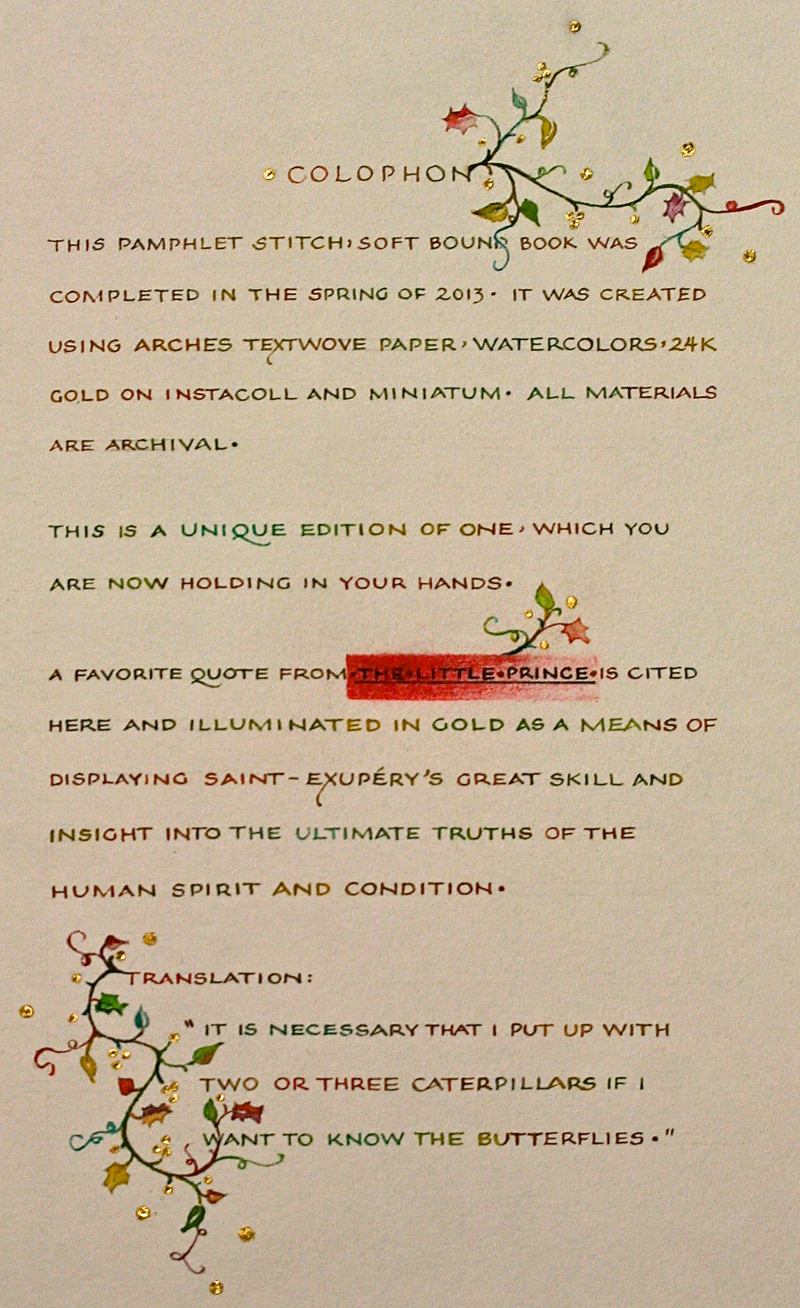
This work was done by Maggie Gillikin in San Antonio this year for the second session “Pressurized Romans” in 26 Seeds: a Year to Grow. In her own words:
| For our assignment to lay gold and to do a roman with a serif, I happily chose a quote from The Little Prince, by Saint-Exupery. I had total success with Instacol and the capital I on Arches text wove paper. I wanted to experiment with Miniatum ink through a pen nib, using a number six Mitchell. I had excellent results with the nib if I cleaned it frequently. | I also found legibility of the gold letters was enhanced by outlining them, using ivory black watercolor and a Nikko G nib. All the vining and leaves are done with watercolor. All the dots have a Miniatum ink base applied with a Nikko G nib. The red box surrounding the title is done with Derwent Studio Pencils. Each page of the pamphlet is 10" by 6.5". |
* * * * * * * * * * * * * * * *
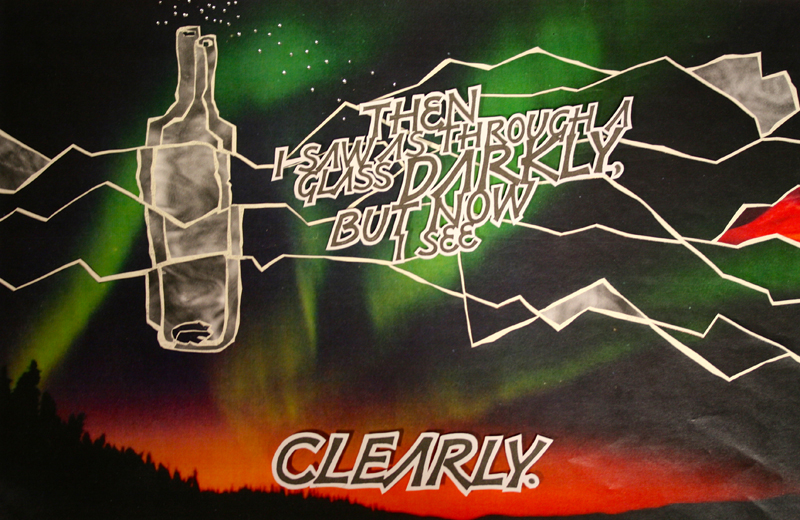
This work was done by Michael Smith in Atlanta in 2012 for the fifth session “Design: Deconstructing the Grid” in PRIMITIVE TO MODERN. In his own words:
|
I first saw a picture of the Aurora
Borealis in a book my brother was reading when we were kids. His
description of the phenomenon left me awed. When Reggie showed
us his array of photo prints, the one depicting the Aurora
Borealis was a no-brainer for me. Matching it up with a short
verse or quip, however, was another matter. The variation to 1 Corinthians 13, at first, left me ambivalent (clever but sacrilegious), but the Aurora felt like a pane of glass and a connection was made. The Aurora photo (11” x 17”) was stuck to a waxed Fabriano 300#CP w/c paper and a layout tissue was created to show where I wanted to ‘slice’ the photograph (mimicking broken glass). The double bottles enhanced the “seeing as through a glass darkly” analogy, but added a twist since the ‘then’ and ‘now’ had been transposed. |
Reggie pointed out that when opening
up the photo along the slice lines, it’s important that the
white space created is not regular, thus adding interest and
energy. It made a world of difference. Another photograph (B&W),
which I can only describe as ‘what seemed to be smoky glass’ was
used to replace the shapes for the bottles and a few odd
polygons. Also another polygon was replaced with a piece from a
red photo to mimic the red glow at the bottom and add interest
to the piece. The letters were written with a Speedball B-3 nib and squared off with a Brause EF-66. After enlarging, reducing, tightening and playing with different layouts, the final layout was copied onto 65# cover stock and then cut out with a white outline. Small pieces of foam core were glued to the back of the lettering to raise it off the photograph and give an additional shadow and 3-D effect. Then the trusty hot foil gun was used to add silver “stars” (or “bubbles” escaping from the bottles). (Time was of the essence, and I didn’t get ‘enough’ of the hot foil stars down when this photo was taken.) Nevertheless, it was an absolutely FUN project! Thank you, Reggie. |
* * * * * * * * * * * * * *
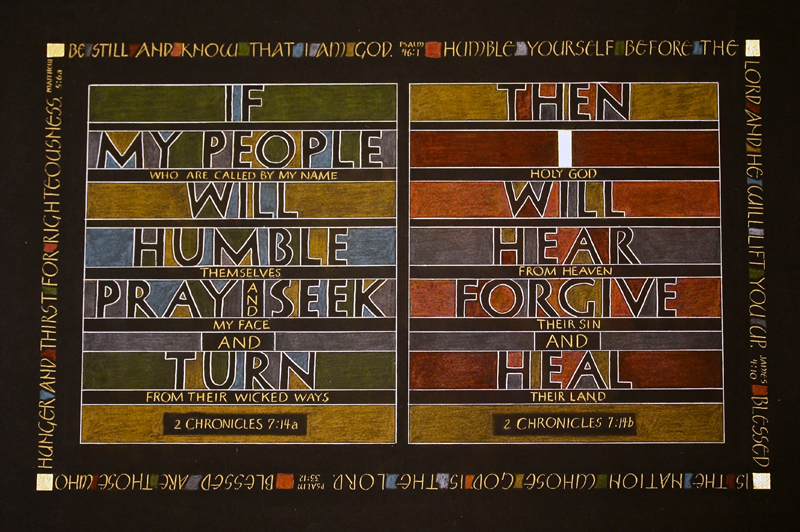
This work was done by Karon Wheeless in Austin this year for the third session “Variations on Romans” in 26 Seeds: a Year to Grow. In her own words:
|
Materials: 15”x 22” Arches Black Book Cover paper, Dr. Martin’s
Bleedproof White, Schmincke’s gold gouache, colored pencils, 23k
loose leaf gold. A Nikko G pointed nib was used to do the white
outlining and an EF66 nib was used for the gold lettering. This piece was done as Month 3 Homework, which involved the use of gilding and any Roman Cap variation that we had learned in class or that was in the handouts. It was also done as a piece to submit for admission in a Waco church’s fall art exhibition and benefit. I chose a verse that would fit into the theme of the exhibition and then tried different Roman caps to see which seemed to fit the verse. I wanted to have the two parts of the verse displayed side by side in order to emphasize the parallel phrasing, so a grid-type format seemed to fit that. I chose a strong, solid Roman cap variation, because it would be bold in the grid. |
The first draft was done on 2 pieces of black Strathmore
ArtAgain 9” x 12” paper in order to experiment with size,
spacing and colors. I chose to use the gold and gray on both of
the phrases and the cool blue and green for the “people” phrase
to represent the coolness of the passion of the people and warm
red and orange to represent the warmth of the passion of God.
After working with the two sheets until I had the layout I
wanted, I copied them on the copier and then used Saral paper to
trace them onto the Arches black cover paper. I soon discovered
that there were several differences in working on the smooth
ArtAgain paper and the more “toothy” black cover paper. One
surprise was that some of colored pencil colors appeared
differently on the two papers. Another difference was the types
of nibs that would work best each paper. After finishing the two grid parts, it seemed that a border was needed. I decided to add color between the words in the border to kind of draw all the colors together. The last step was to gild the “I” in the second grid and the corners of the border. Although the “I” looks white in the photo, it is gold. The whole process of design, experimentation, and completion was a wonderful learning experience. |
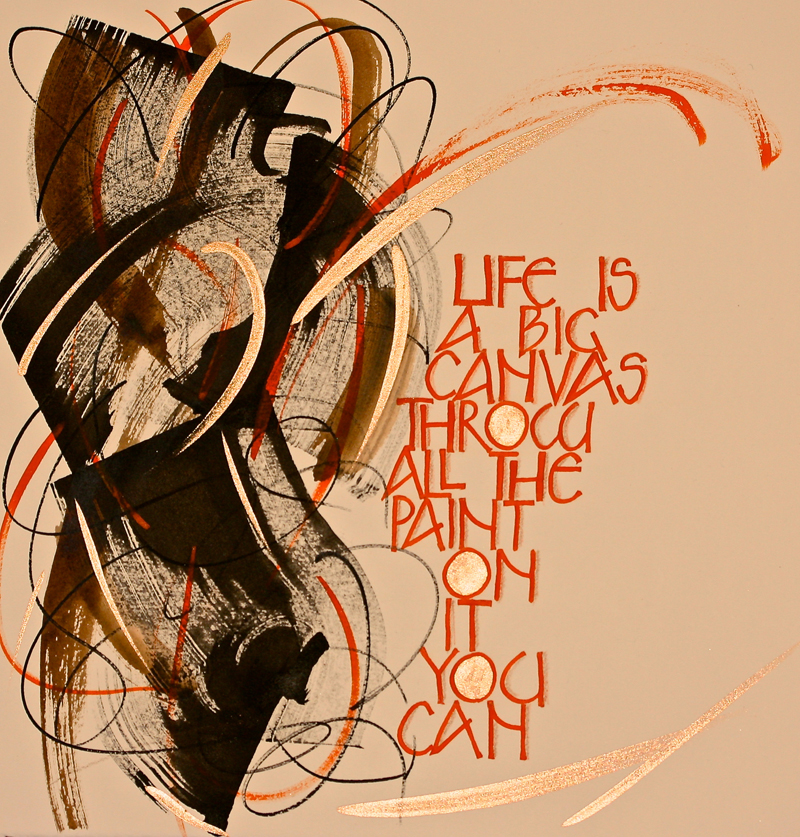
This work was done by Elena Knapp in Austin this year for the third session “Variations on Romans” in 26 Seeds: a Year to Grow. In her own words:
|
"LIFE IS A BIG CANVAS THROW ALL THE PAINT ON IT YOU CAN" I have always liked this quote Talking about canvas not life I was always a person that would be really "scared" to splash colors on canvas ( I m getting better), I would be more of a person that would apply colors very carefully, counting steps and making sure all edges are clean and neat:) At the same time I m a person that would be fascinated watching people who would not afraid of freely mixing it up colors and apply layers after layers and be comfortable with the colors, anyway... long story short in order to learn how to play with backgrounds and how to make my calligraphy pieces more interesting and fun |
I was talking a class in water colors and while trying new
techniques in the class I used balsa wood to deep it into sumi
ink and walnut ink and made those texturized lines on the left
of my piece, I did add more lines with a back of my brush (just
dipped it into ink) and right then I realized this quote would
be a perfect one for this "good splash" of paint. So I used Vermillion Sumi Ink to do the lettering, once that was done I really felt that one side of a piece is really lacking some weight, so next step was adding some shading to the letters, - that was not enough, I added some color into the black and brown so I added some orange ink too Next step was adding some gold to add a color and make it more finished. the size of this piece is 12' x 12' and its done on Watercolor paper other materials used walnut ink, sumi black ink, balsa wood to apply ink, B3 speed ball nib for lettering, and for gold I used FineTec pearlescent watercolor. |
* * * * * *
This work was done by Leslie Winakur in San Antonio this year for the third session "Variations on Romans" in 26 Seeds: a Year to Grow. In her own words:
|
I have been an admirer of Gustav Klimt's work ever since I first
saw it. And I was determined to make Instacoll work for me this
month! So those two things were my starting point for these
pieces. The homework assignment was to use any variation of
Romans, and when I looked through all of Reggie's samples in the
handouts, I saw the art nouveau letters and was reminded of
Klimt. I went to my books about Klimt and found some of my
favorite things - the "Ver Sacrum" and "Nuda Veritas" series. I
especially love the long, narrow designs of those pieces. I also
looked at lots of images of his Beethoven Frieze and other work,
in which he uses a lot of gold, along with stylized shapes of
flowers, geometric shapes, etc. It took me about a week to
settle on the words. I've always had an appreciation for
Thoreau's ideas in "Walden" and they seemed to fit with what I
was picturing in my mind. I drew the basic design and all the lettering in a grid pad, taking care to keep my proportions very close to Klimt's. Then I made several copies of the design and changed the one word at the bottom by taping it onto the first one. Then I transferred the entire piece to 90# hot press paper using the graphite Saral transfer paper. I then laid the Instacoll in the two panels where the gold would be. I finally remembered that Reggie said to water it down, which I have done a bit in the past, but not successfully. This time I put about 7-8 drops of water in barely a half well of Instacoll, mixed it thoroughly, and went to work. And it worked! It dried very fast and I had to work fairly fast to keep a "wet edge" as I laid it. In a few places I accidentally let the Instacoll touch where the line of the letter was super thin. I used only one layer of Instacoll, and then I laid one layer of patent gold onto it. I tried to lay a second layer of gold, but I couldn't get it to stick, even when I breathed on the first layer. It's been over 100 degrees here for weeks now, and my air conditioner is running nonstop, so I think it may just be way too dry for things to stick right now. But the one layer looked good to me, so I decided to remember the adage "better is the enemy of good" and didn't push my luck! |
Then I painted in the letters, and I used Payne's gray
watercolor for that. The gold repelled the paint here and there,
but mostly it was fine. Where the Instacoll had obliterated my
very thin lines, I scratched through it a bit with my Nikko G
nib, and it did fine. I painted the letters with a tiny brush
(Raphael 8404, #0,1, or 2), on one piece, the Nikko G on
another, and the Brause EF66 on the third. They all worked fine. I painted the middle panels last, using watercolor. And then I barely pencilled my design onto the watercolor, just a freehand idea of where I wanted things. Then I drew the design in with Kolner Miniatum Ink, using the Nikko G and/or the EF 66. And then I had the best surprise. I expected the gold to stick to the paint when I laid it on the Miniatum ink and was fully prepared to scrape all night with my little scalpel. But nothing stuck except where I wanted it! I guess watercolor has a lot less binder than gouache, and it was wonderful. The last thing I did was to draw the dark outlines around the panels with the Payne's gray watercolor and my Nikko G nib. I used a cork backed metal ruler and wiped the excess paint off the edge of the ruler after every single line. It worked very well. So I'm very pleased to have gotten the Instacoll to work like I want it to, and very happy to have learned that gold doesn't really stick to watercolor. If I were to do this again, I think I would use a much heavier hot press paper, since the watercolor did make the paper buckle some. |

* * * * * * * * *
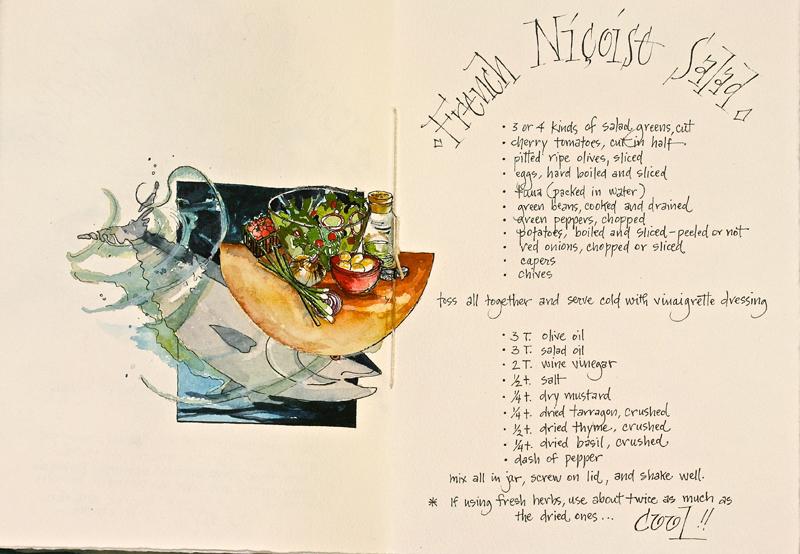
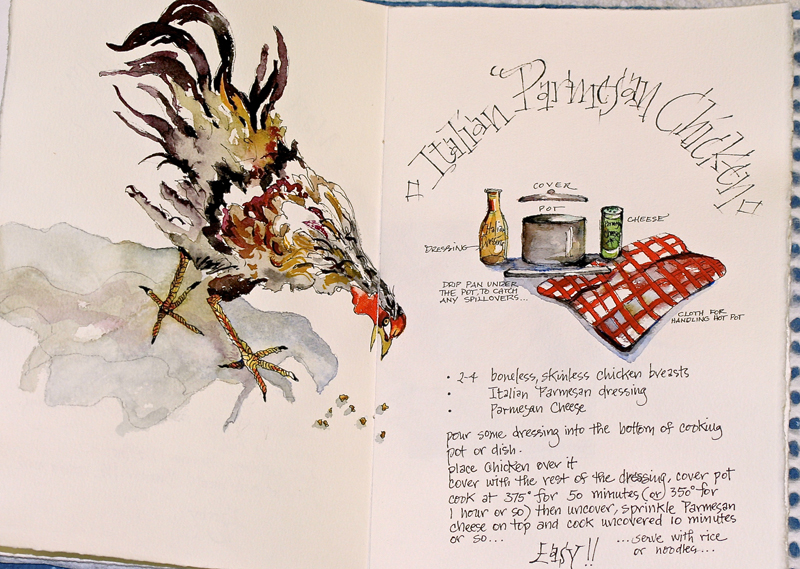
This work was done by Maggie Gillikin in San Antonio this year for the third session “Variations on Romans” in 26 Seeds: a Year to Grow. In her own words:
| These pages are part of a pamphlet stitch book constructed for my Secret Pal, who is a spectacular cook. The recipes are family ones. I loved illustrating them with watercolors. The chicken was originally photographed by me in Williamsburg, VA, many years ago. The Nicoise salad painting has a tuna straight from Webster's Dictionary and salad parts from my refrigerator. | The paper for this book is Hahnemuhle Schiller, and the letterforms were written with a Nikko G nib and ivory black watercolor. The sewing is in the middle of the tuna illustration, and the threads are custom colored with watercolor pencils and a dab of water. |
* * * * * * * * *
This work was done by Victoria Lansford in Atlanta in 2012 for the sixth session “Experiencing the Book as a New Structure” in PRIMITIVE TO MODERN. In his own words:
|
I began this book early on in Primitive to Modern, but it
ultimately took 14 months to complete. It encompasses the
majority of my technical and artistic loves: Eastern repousse
metalwork, collage, compelling portraiture, unique calligraphy,
and book binding. The copper front cover portrait is of my son, Skyler. I snuck the photograph on which it's based when he was 11-1/2 in 2011while he was gazing out the ferry window on a trip up Puget Sound. I first drew the portrait with Prismacolor pencils on goatskin vellum. Before it was complete I knew that I also needed to hammer it in metal, and that instead of being a framed piece, it needed to be something rather more intimate. Skyler had recently become a Shakespeare fan (no one does bawdy humor like The Bard), so I began researching passages that would fit my perspective of his thoughts and dreams as he stood on the edge of childhood, looking toward his teens. My husband and I joked that Hamlet (my personal favorite) was too obvious, and The Tempest was tempting, given our never dull for a moment lives; when I found Theseus' speech from Midsummer Nights Dream, I knew it was perfect, even if I did rip it out of context just a bit. The speech was taken from the 1600 First Folio held by the Bodleian Library with contemporary English spelling applied. The breaking of the lines into this layout was inspired by the Bard but was, alas, subject to the whims of the artist. The calligraphic lettering is a broad edged hand that I began developing in 2012 and is inspired by a particular style of Arabic writing from antiquity. |
The Eastern repousse process on the copper sheet front cover
involves hammering 24 gauge sheet metal alternately from the
front and back with specialized tools that I produce for
metalsmiths. When hammering from the back to puff the metal out
I supported it with plasticine. When hammering from the front to
countersink areas or create the details of the features I
supported it with pitch (natural tree resin) to give more
resistance. Eastern repousse dates back to the ancient Egyptians
(think Tutankhamun's mask) and is a technique I've revived for
contemporary use. The images in the book block are original collages and drawings and a few NASA photos that I digitally manipulated to form a continuous thread. As the cover became higher in relief and increasingly more of a project than I could ever have anticipated, I decided my original book block on Arches Hot Press was too short in length, so I completely redid its design. For the second version I used a matte photo paper by Inkpress. While the paper produced wonderful color on the prints of my collages, it wasn't the easiest surface on which to letter despite a great deal of spray fixative. I used a snipped EF66 with stick inks and gouaches for the lettering. I used Dr. Martins India ink and a pointed nib to draw the pattern on the copper back cover then etched it with ferric chloride and patinated the etched areas to make the raised design stand out. I wanted the back cover to be as tactile as the front yet be structurally flat so the book would open well. I bound the book in the long stitch style with copper leaf paper on the spine. My hope is that the collages and style of lettering create a sense of visual depth equal to that of the text and of the literal height of the Eastern repousse and that together these elements reflect the depth of my love for my son as I watch awestruck, his metamorphosis from child to teen to adult. |
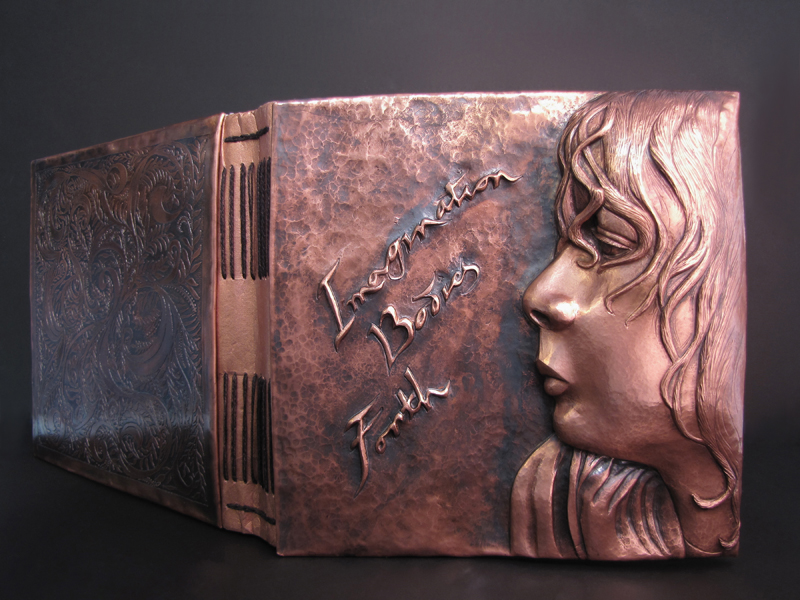
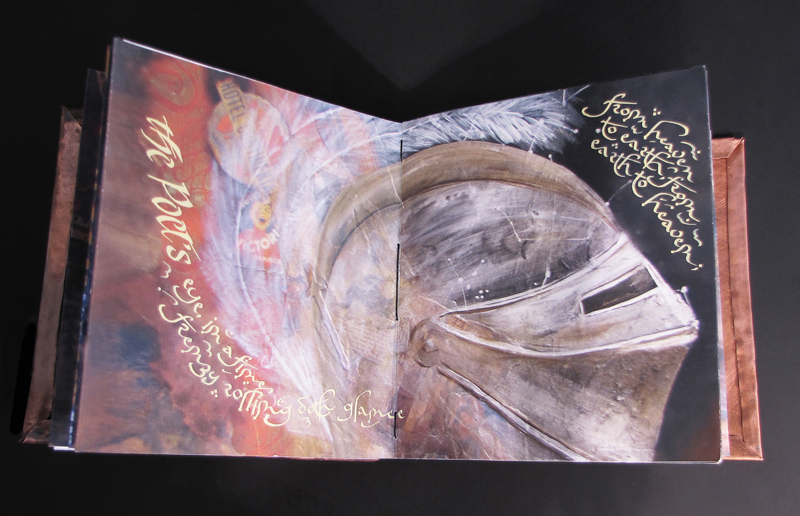
* * * * * *
This work was done by Suzie Ickles in Austin this year for the third session “Variations on Romans” in 26 Seeds: a Year to Grow. In her own words:
|
Sometimes I really struggle with assignments: finding the right
quote, planning the preliminary layouts, deciding which words
and how to emphasize them, picking the lettering styles,
selecting colors, backgrounds, not to mention the myriad of
options in creating the actual piece. Then, occasionally the
stars align and all comes together, working out just as I
imagine. And so it was with this. With one week left until the next Reggie class, I wanted to have one more piece to present. I Googled "quotes color love," not knowing what I really wanted and found this quote. I did several pencil thumbnail sketches of how to lay out the words, then quickly picked the one I liked. I wanted to do a piece with white words and a painted background, so decided to draw my current favorite, the Neugebauer letters. With the 5H lead on my 11x17 grid pad, I very lightly drew the outline of the letters. To get the words centered I started in the middle of the line and worked right, then left; if it was a bit off, I erased and moved it. I wanted no interlinear spacing and tight word spacing, to form a dense block of text. After a lot of erasing and adjusting, I had the layout on my grid paper. Then I drew over all the lines again with a 0.5 mechanical pencil and a straightedge to make the letters a bit darker and crisp. |
Next, I transferred it to the 18x24 cold press (since I am
painting it) watercolor paper by centering and taping the grid
paper to the back of the watercolor paper, then putting it on my
Lightpad and lightly tracing all the lines with the 5H lead and
straightedge. Using my 16 color set of Prang watercolors and a #2 brush, I had fun painting 2 or 3 colors in each of the negative spaces. In a few places I used Dr. Martin’s Bleedproof White to touch up edges. Around the perimeter I originally planned to make a straight edge, but instead I started pulling out the wet paint with my finger and ended up with a very irregular and softer edge (a happy accident). Finally, I erased all visible pencil lines and added a pencil shadow on the word "heart." This project made use of many tools, materials, and skills I have learned in Reggie's 26 Seeds class. It has also given me the confidence to attempt larger pieces such as this. |
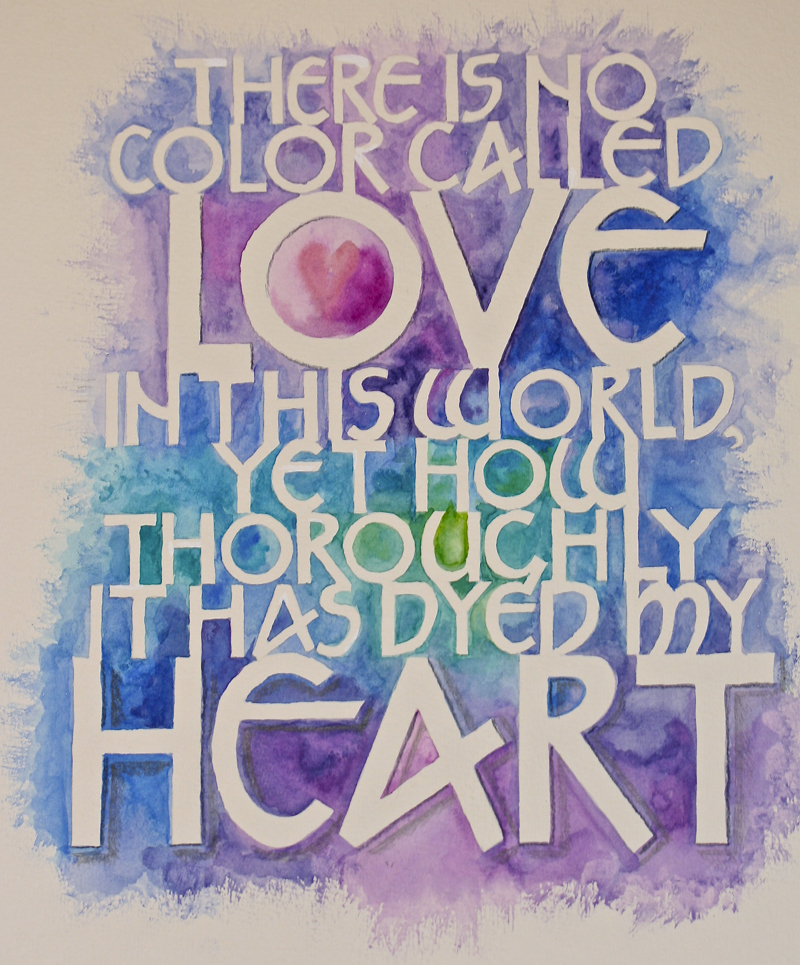
* * * * * * *
This work was done by Carol Hall in Nashville this year for the third session "Illumination on Vellum” in PRIMITIVE TO MODERN. In her own words:
|
This piece was done for Session 3,
assignment #1. (Codex Aureus) I wanted to do these particular words in a way that would be as impacting as the words themselves are to me. I chose the modern lettering style that was in the handouts from the 26 Seeds class. (I had been wanting to do a piece with these letters.) |
I did some sketching and the breakdown of the words worked out well for the positive/negative pattern of the Codex Aureus layout provided by Reggie. I transferred the design with Saral paper and laid down two layers of gesso followed by a layer of instacol and 2 layers of gold leaf. I then added the red lines with Cadmium Red pigment and a ruling pen. The paper is Arches black cover. Size: 9 X 12. |
* * * * * * * * * *
This work was done by Haley Ping in San Antonio this year for the third session “Variations on Romans” in 26 Seeds: a Year to Grow. In her own words:
| I did this piece for the third session of 26 Seeds. Long quotes always seem to intimidate me so I dove right in hoping for the best. I did the layout on grid paper with a pencil then tried different colors with colored pencil on tracing paper laid over the final layout. A blank space was left in the layout while I lettered, intending to find a symbol or image that would work with the text. The paper is Niddegan cut to 13"x11". I penciled all the guidelines before the lettering with gouache. I used Speedball B4, 5, and 6 nibs with the EF66 for squaring the corners. | Only after I finished the lettering on the good paper did I decide on what exactly the symbol would be. The symbol I found in the Book of Signs that Reggie showed us in one class session. It said it symbolizes faith, the patient expectation of salvation coming from above. It also reminds me of the chalice for communion especially painted with a dark red (perylene maroon watercolor). After so much time with the text I felt it was appropriate because communion gives forgiveness of sins and the text is about salvation. |
This work was done by Maggie Gillikin in San Antonio this year for the third session “Variations on Romans”
in 26 Seeds: a Year to Grow. In her own words:
| Denis Brown and Reggie Ezell introduced me to vellum. It is a most beautiful surface to work on. I love the symbols of early language, and Afrikan symbols are particularly strong and elegantly simple. This small book (3 3/4" x 4 1/4") is composed of vellum scraps of various sizes, attached to an Arches text wove text block. Watercolor was used throughout, with number six Mitchell and Nikko G nibs. Paintings were done with a number two Raphael Kolinsky sable, 8404, brush. | Stretched Romans formed the title Afrika, (Afrikans spell it with a k). The paintings on the left edges of the vellum pages hide the stitching of the vellum to the text block. Paper backed fabric was used inside the clam shell box which houses this flat back cased in book. A few watercolor touches were added to the area around the purple rhino image. I thoroughly enjoyed this project and all the valuable instruction I received concerning vellum. |
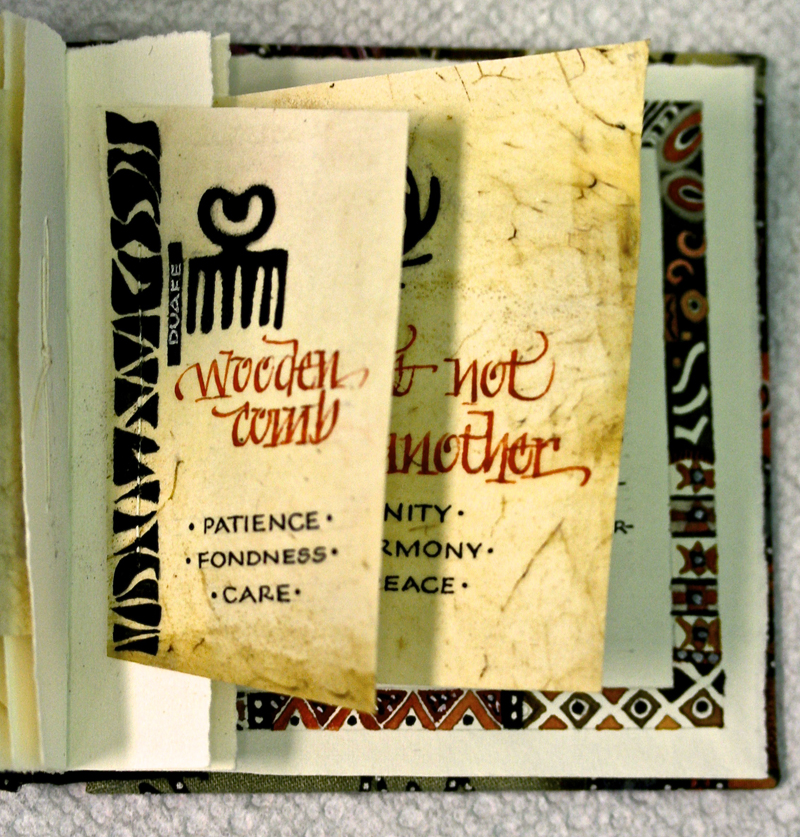
This work was done by Sheryl Bracey in Nashville in 1998 for the third session “Variations on Romans” in 26 Seeds: a Year to Grow. In her own words:
|
Boy, was I surprised when
Reggie wanted to use my piece for the Pic of the Week. It has
been 15 years since I did this one. When Reggie asked us to read the book, "Anonymous was a Woman" by Mirra Bank, I was struck by the words of these women...especially since one of my best friends was a quilter and I had done a little myself. Reading those words inspired me to do a paper quilt since we were to use these colors and values. I would love to say that I spent hours on the layout but I just started drawing lines of the quilt squares and knowing I needed ten of them to use all of the colors. Where was I going to write??? I decided to use the middle and lower bottom...the middle for the largest amount of text. I had to do that many times in pencil on graph paper to get the lettering small enough to fit the space. I used a B nib and squared off the tops on the middle section. The lower part was done in the Tom Perkins Caps using a Mitchel nib. It was my first attempt at doing both except for what we did in class. (Hopefully by now I have refined those letters) |
I used Winsor & Newton Gouache for the entire piece on Arches
140# hotpress watercolor paper. The black is gouache also. I
wish I had left more room on the edges for the black, but as I
said, it was a work in progress. Are there things I would do
different? Absolutely! But, after spending 40 plus hours and a
lot of detail I was pleasantly surprised at the outcome. I even
enjoyed drawing the stitching. My favorite part of this piece are the words of Aunt Jane of Kentucky, ca.1900...."But when one of my grandchildren or great-grandchildren sees one o' these quits, they'll think about Aunt Jane, and, wherever I am then, I'll know I ain't forgotten." Maybe the same will be true of my calligraphy. |
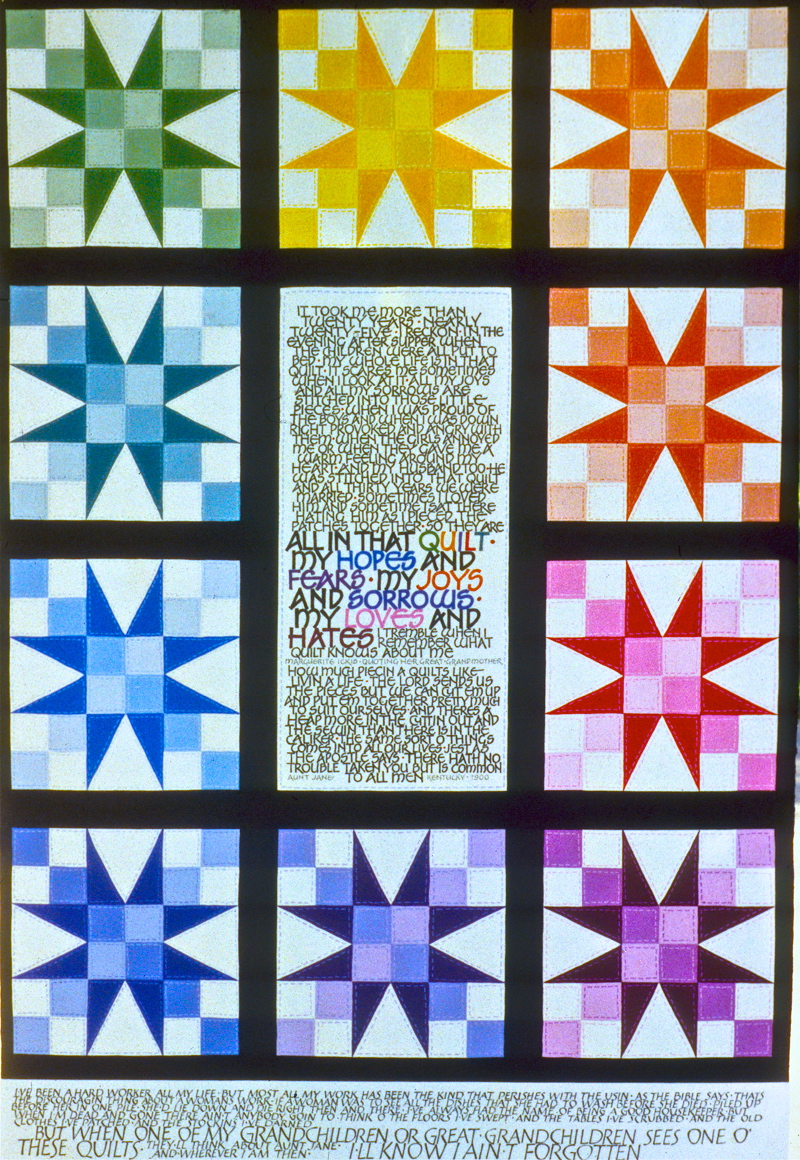
* * * * * * * * * * * * * * * *
This work was done by Jen Grove in Nashville this year for the third session "Illumination on Vellum” in PRIMITIVE TO MODERN. In her own words:
|
This little prayer was done on
vellum, and then tucked into a piece of purple vellum I got from
Jesse at his booth at the 2010 Calligraphy conference at
Stonehill College outside of Boston. I was absolutely intrigued
by the holes, which Reggie has indicated were most likely from
the wound that killed the animal. I believe this cover IS deer
skin dyed with the Brazilood chips. The vellum I wrote on, was calf skin from Permagema also, but prepared by the sanding process that Reggie taught us. and here is the thing about this little pocket prayer (closed circa 3"x5"): |
I had never written on vellum with such satisfaction. the
process of lettering on it was exquisite. and the translucent
quality of the piece just blew me away! truly, this was the
greatest sensation to spill these little pen Roman letters out.
I matched the gouache very close to the color of the dyed vellum, and wrote with a Mitchell 5 I believe. The marks on paper that serve for texture on this piece were inspired in a Pamela Paulsrud class and are walnut ink and sumi, they are totally random. I used a viewer to fine the squares I liked and included them in her for some visual fun.This has always been my fave Psalm, and I sing it to myself raggae style every chance I get. |
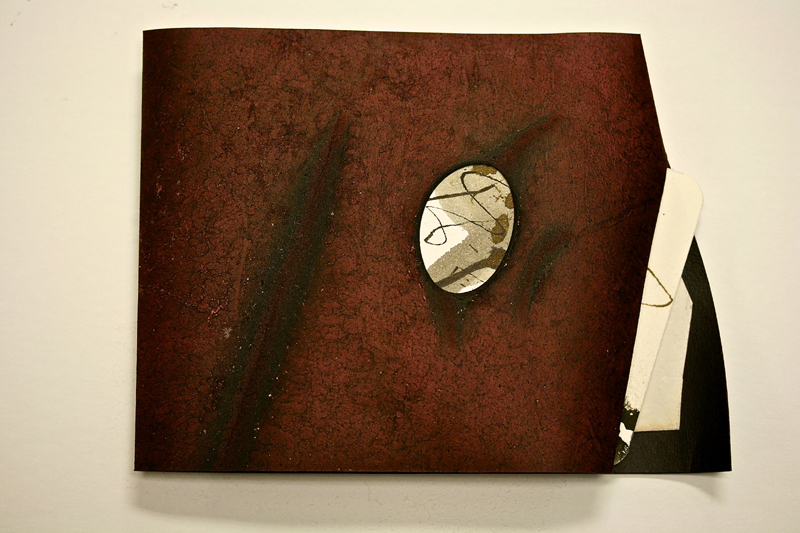
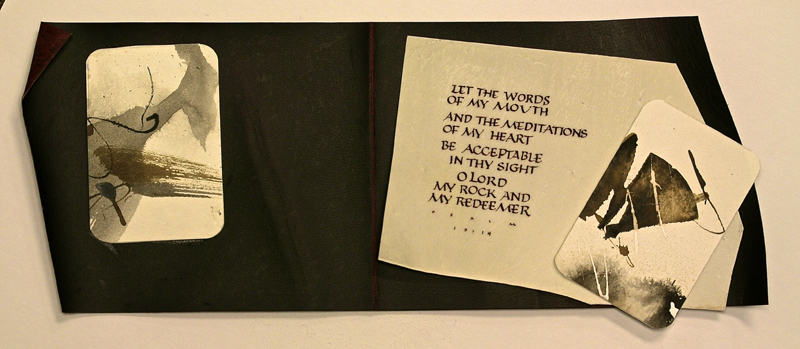
* * * * * * * * * *
This work was done Maggie Naylor in Nashville this year for the fifth session in PRIMITIVE TO MODERN: “DESIGN: Deconstructing the Grid”. In her own words:
|
DESIGN IS THE DELIBERATE ARRANGEMENT OF ELEMENTS FOR A DESIRED
EFFECT was a statement on page one of our handouts that inspired
me to begin looking for my personal desired effect using the
quote I chose from Louise Hay, “Every thought we think is
creating our future “. I found my symbol nestled among an
earlier handout of a Christmas card, by Stuart Barrie, It came
upon a midnight clear…There was a very small angel floating
across the page just waiting to land on my page. The process was begun by using pencil on grid, progressing on to a B3 nib, Sumi ink, tracing paper, removable tape, graph paper, and transparencies. The quote was resized three times (100%, 75% and 60%). The room was busy cutting, making transparencies, resizing their quote and designing. What excitement began to fill the room! My final quote was lettered on Paris Paper for Pens with a B3 nib, sumi ink and sharpened with a small micron pen. The whole quote was cut out leaving a small margin of white around the image. |
Choosing the 11 x 17 stained glass paper I used was a hard
decision since there were so many beautiful selections. I chose
two copies that were compatible color themes. I had my angel,
and quote. Now a design was next. Tracing paper and pencil came
in handy again. I chose a circular pattern with straight lines
connecting some of the circles and of course, the angel was
flying. I used the light box, tracing paper and stained glass
paper on the 15 x 22 waxed heavy paper Reggie provided. I drew
the outlines on the stained glass paper with a thick black
sharpie and cut on both sides of the thick black lines trying
not to make them the same on both sides. When the paper pulled
up a lovely design was made. I used the coordinating paper to
“piece” the angel. The hot foil pen was such fun. Dots were
flying everywhere. I didn’t finish getting my colored dots on
the piece, but I will add those later for even more pizazz. A
trick Reggie taught us was to glue cardboard spaces on the back
of the quote. These give a shadow and 3D effect for
photographing. With the quote attached, the piece is ready for
reproduction. Size: 11 x 17 This was a project that I truly enjoyed and had such fun in the process. Thanks again, Reggie, for a wonderful time! |
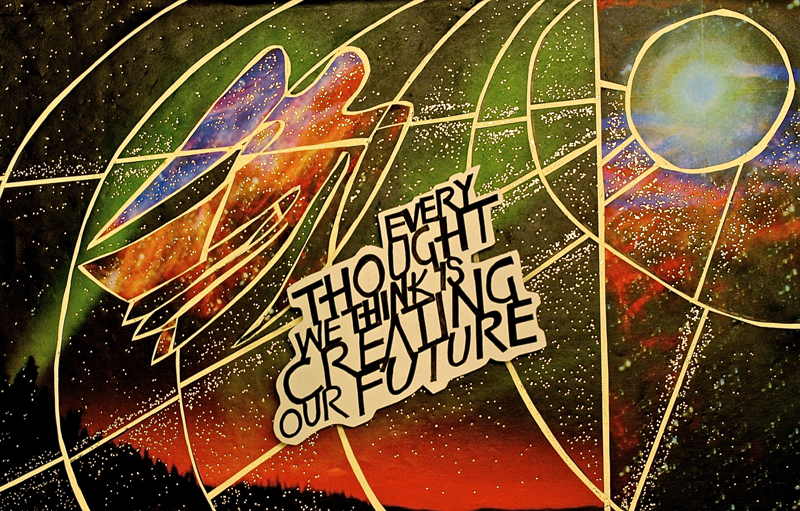
* * * * * * * * * *
This work was done by Haley Ping in San Antonio this year for the third session “Variations on Romans” in 26 Seeds: a Year to Grow. In her own words:
|
Reggie said to keep in mind rhythm, texture, pattern, and
movement for the third session's homework. So with that in mind
I played with layouts for the Latin VDMA (Verbum Domini Manet in
Aeternum) with it's translation The Word of the Lord Endures
Forever. I knew I wanted to give it to one of my sisters,
Brigid, for either her birthday or Christmas so I did a little
research and found this version of St. Brigid's cross in 101
Celtic Crosses. The meaning paralleled the words and the design
and the crown seemed to suggest circling the words around the
cross. The large Latin lettering is Tom Perkins Roman caps in Moon Palace sumi ink and the translation underneath is my own Roman caps handwriting. |
I used 23k loose gold on two layers of thin Instacoll outlined
with sumi ink in a Nikko G nib for the cross and watercolor for
the color. The paper is a Fabriano Uno soft press watercolor
paper 300 lb. from a sample pack I got years ago that I cut it
down to about 8-1/4" by 9". The hardest part was spacing the large Romans in Latin. I penciled the words in and had to adjust a few times before everything fit around on the final piece. My practice layout had enough room around to add an oak leaf so the height of the letters must have been slightly different. That old compass from high school math must not be as accurate as I hoped. My favorite part is how the gold looks on the soft press paper. It's not as smooth as glass but took on the slight bumpiness of the soft press. |

* * * * * * * * * * * *
This work was done by Becky Hughes in San Antonio this year for the fourth session Carolingian and Variations, in 26 Seeds: a Year to Grow. In her own words:
| I have always loved the writings of John Muir and chose this quote from John of the Mountains - The Unpublished Journals of John Muir. I constructed the piece as a Japanese stab binding book 12 3/4 in. x 5 3/4 in. in a vertical format and bound along the 5 3/4in. using the hemp leaf stitch with linen bookbinding thread. The covers are cave paper and the end sheets are Lamali. Text is lettered on Arches text wove, Ingres-Fabriano, | and paste paper made using Arches text wove and done in greens, golds, oranges and browns. I used photos I had taken along the Guadalupe River and printed them in a warm black and white directly on Arches. For the lettering, I used red ochre stick ink and chose an italic variation of Carolingian. To give some variety to the pages I wove paste paper strips into some of the paste paper pages and cut openings or diagonals to view a following page. Cut openings are embossed 1/4 in. from the edge. |
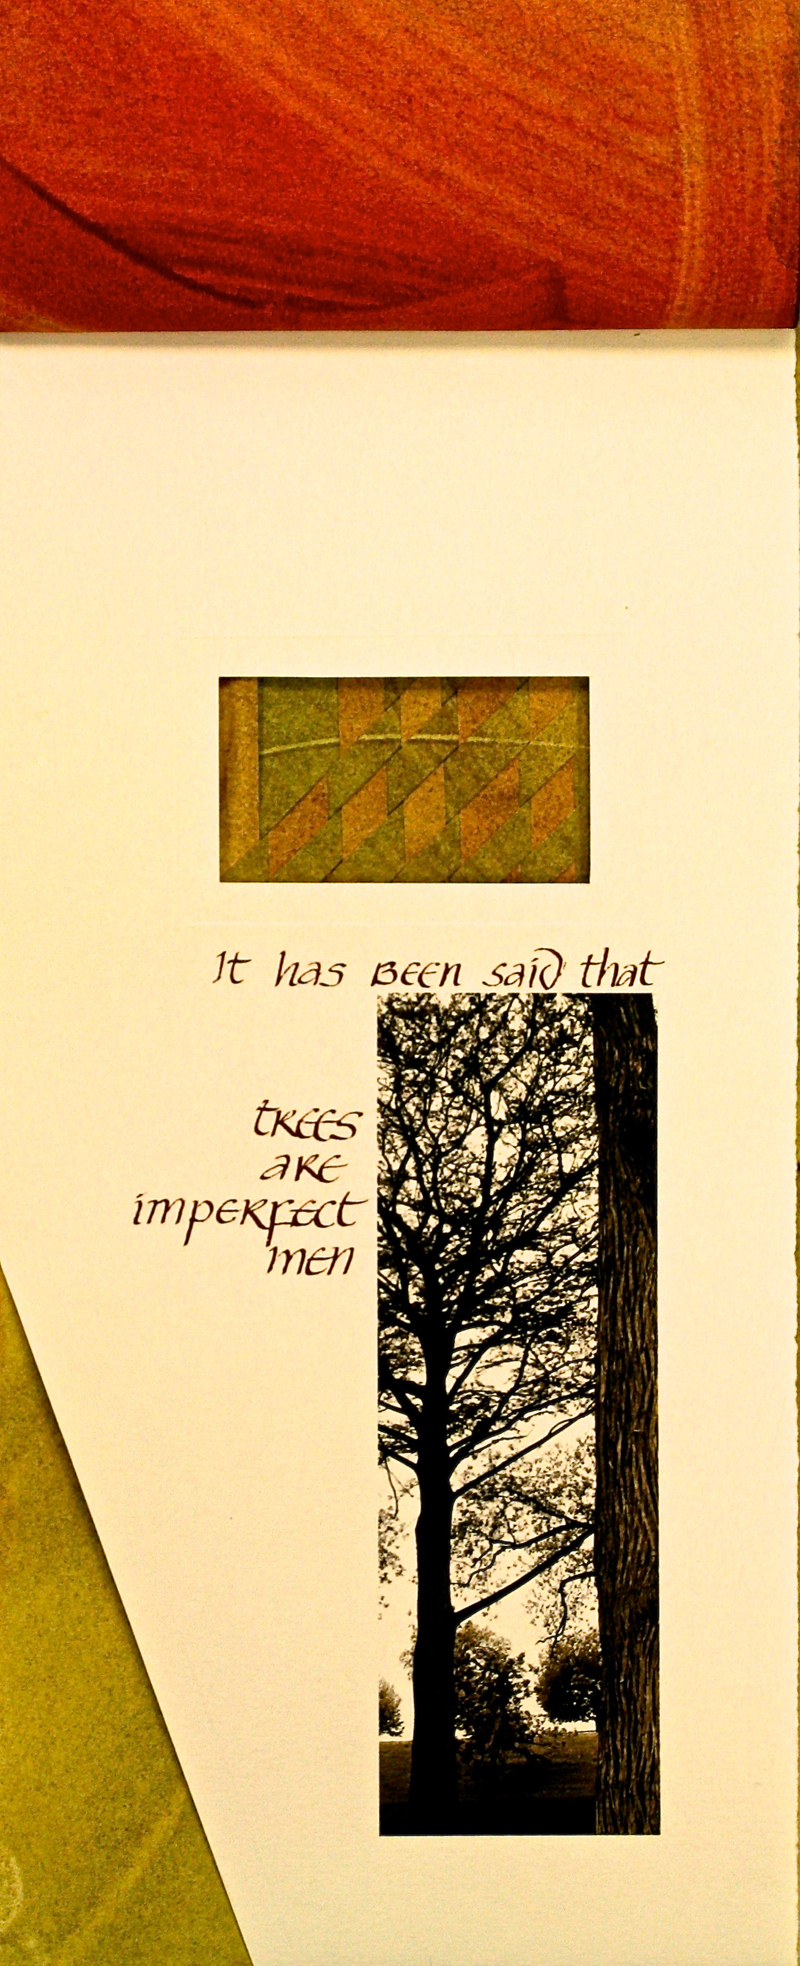
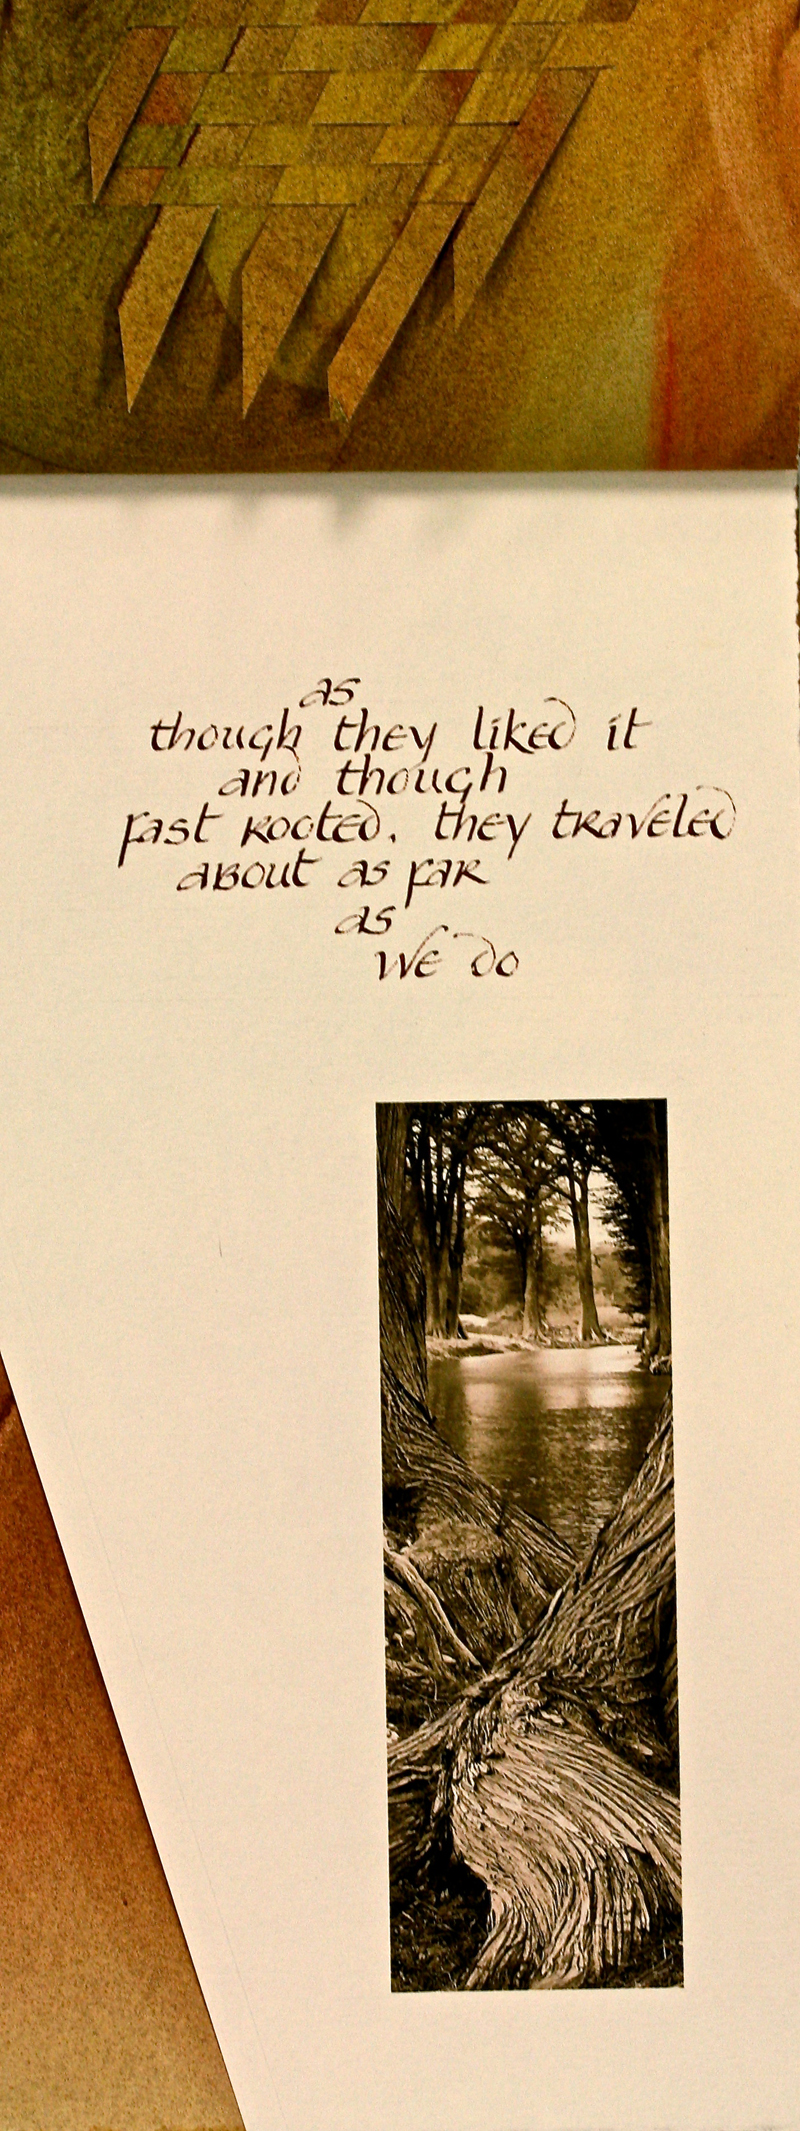
* * * * * * * * * *
This work was done by Ron Ross in Nashville this year for the fourth session in PRIMITIVE TO MODERN. In his own words:
|
What a wonderful resource the Hubble and NASA websites are. This
image was downloaded to my iMac then processed in iPhoto. After
cropping and some highlighting I printed in on Arches textwove. If you don’t have an 11 x 17 printer save it to a thumb drive and take the drive and your paper to a copy center. |
Have then print on your paper then trim it when you get home. I picked an appropriate quote and lettered in vertically. Leonardo has a base coat of white Gesso an three coats of Gold. The last being 24 K loose. |
* * * * * * * * * * * * * *
This work was done by Juanda Bergquist-Powell in Austin this year for the third session, “Variations on Romans”, in 26 Seeds: a Year to Grow. In her own words:
|
I named this piece “We Hope in You.” The total verse from Psalm
33:22 is “Let Your mercy, O LORD, be upon us, just as we hope in
You.” My overall objective was to visually stress the intensity of the “hope”. I used condensed lettering (to create texture) along with bright high contrast colors: blood red, pine green and sea foam white. I think people are drawn to look at the piece because of the complementary colors. The red / green giving the sense of the deep level of heart felt sincerity of the verse. My intention in using the light sea foam white color on the words “O LORD Your Mercy ...” was to make them the first words that a person would read. I also explored how to arrange the words to compound the meaning. My thought was to repeat some words like the rhythm of a lyrical refrain in music (e.g. pine green colored words “be upon us” above the red colored words “LORD HAVE”). To me this was like washing waves of water which fit with the swirling pattern. |
I used a block to contain all the text because I wanted the
pattern of the swirling background to be the only movement felt
and let that movement of the pattern connect inside of the line
drawing of the crowd shown outside the ancient middle eastern
city [Images From: Good News for Modern Man Bible, c. 1966]. The hardest decision was how to weave and scale the text in a way that contributed to the overall goal [The interlocking weave of “as we hope in you” with the word “mercy”]. The size of the piece is approximately 8.5” X 20”. I used green acrylic / oil paint with flour and water for the paste paper to create the background. It is applied with a sponge. Gouache is used for the lettering, the line drawing of the people and buildings. I’m glad that I liked the piece after I finished it, because it was a LOT of work over quite a few days. It involved several preliminary sketches and layouts. When designing a layout or composing art, I don’t mind if people don’t “get it” right away. I want their visual interaction to be prolonged. Great class with wonderfully supportive members! |

* * * * * * * * *
This work was done by Maggie Gillikin in San Antonio this year for the fourth session Carolingian and Variations, in 26 Seeds: a Year to Grow. In her own words:
| I enjoyed the challenge of combining the Carolingian with a stab binding book structure for the fourth class homework. The poem I chose is the first verse of Journal . by Edna St. Vincent Millay. The binding consists of two copper straps, each of which wraps around the spine and goes through a chiseled hole in the book covers and text block. The covers are Arches Black Cover treated with bleach and pastel, and lined with cover weight Canson Mi Tientes. The pages are composed of various papers: rice paper, black German Ingres, ninety pound hot press Arches watercolor paper, translucent drafting vellum (used by architects), and hand made papers. | The smaller pieces attached to the pages were from practice sheets, cutouts from punches, and bits of decorative paper. The translucent vellum takes ink, Sharpies, and Dr. Ph. Martin’s Bleed Proof white quite well. Glue that was used included PVA and UHU glue stick (especially on the vellum). I owe thanks to Judy Melvin for instructions on bleach and pastel on Arches black cover; to Nancy Culmone and Rosie Kelly for inspiration in the variation of the traditional oriental stab binding; and to Reggie Ezell for his fabulous modernized take on Carolingian. |
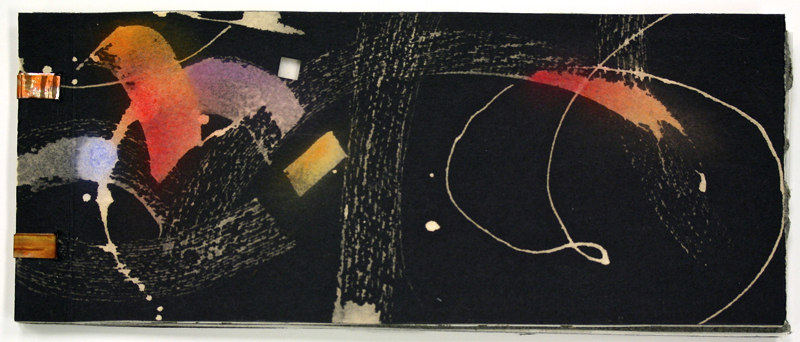

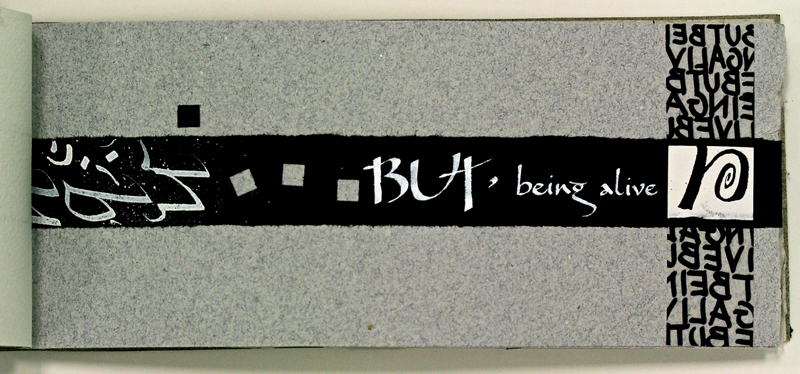
* * * * * * * * *
This work was done by Karon Wheeless in Austin this year for the fifth session “Carolingian and Variations”, in 26 Seeds: a Year to Grow. In her own words:
| This piece was done on a 4” x 9 ½” piece of vellum using black gouache for the lettering and transparent watercolor for the background. I made it for my husband who has a collection of arrowheads that he has found on our Central Texas ranch. It seems that arrowheads, | vellum and Carolingian script all call to mind connections with past eras centuries ago. The text is an expression of the feeling one has when finding an arrowhead and considering how people lived long ago on the land where we live presently. |
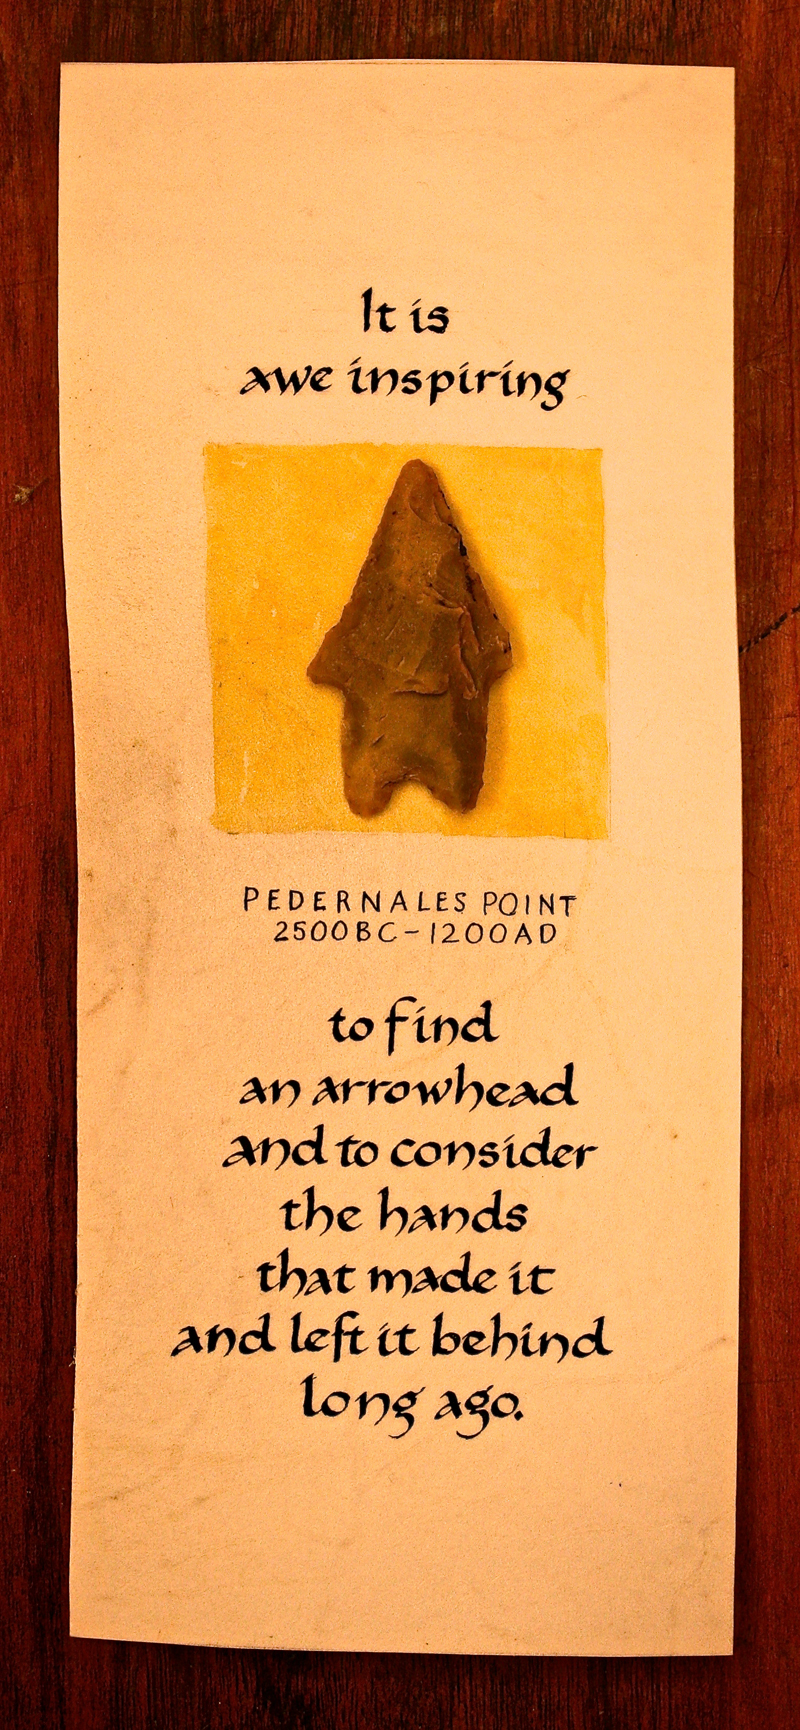
* * * * * * * *
This work was done by Leslie Winakur and Jonah in San Antonio this year for the fourth session Carolingian and Variations, in 26 Seeds: a Year to Grow. In her own words:
| This project did double duty for me as a secret pal gift for my good friend Maggie Gillikin this summer, and as homework for the 4th Reggie class, a book using a variation of Carolingian. Maggie collects bunnies, and I found a cute sculpture of one at Hobby Lobby. A friend suggested that I try to fool Maggie by using rubber stamps, which I rarely do. So I took some photos of the bunny sculpture, reduced them to size, and then transferred the images to rubber stamp material and carved some stamps. I began the story in France, because Maggie lived in Paris in her teens and loved it there. But I felt I needed more action in the story, so I asked my 6 y.o. grandson, Jonah, for help. He immediately added the part about the bunny catcher chasing the bunny and the farmer all the way to Japan, where a ninja bunny saves them. It was perfect, especially since unbeknownst to Jonah, Maggie also lived in Japan, long before her Paris days. I tried several variations of Carolingian but none were suitable for this type of book. I finally found this variation, a sort of cross between foundational and Carolingian which I could still "work" in the same single stroke ductus as Reggie's modernized Carolingian. | It was very comfortable and fun to use. I lettered the large Neugebauer style letters with dirty water, then added a touch of watercolor to them, using a Brause B nib. And I did the rest of the text with a mix of forest green Japanese stick ink and aureolin yellow watercolor. The mix lettered beautifully once I decided to switch from the cut off Brause EF66 to a Mitchell #4 nib. The EF66 was just too fine for the Hahnemuhle Schiller paper I was using, though I loved using it on papers with a harder surface. After Jonah completed the story for me, he offered to illustrate it for me as well, and how could I refuse? He did two illustrations for me, and Reggie kindly included one here. Jonah's is in crayon, and my illustrations are watercolor. Needless to say, there was no way to disguise my work enough to fool Maggie! But she was surprised by the story book and the idea of a ninja bunny. |
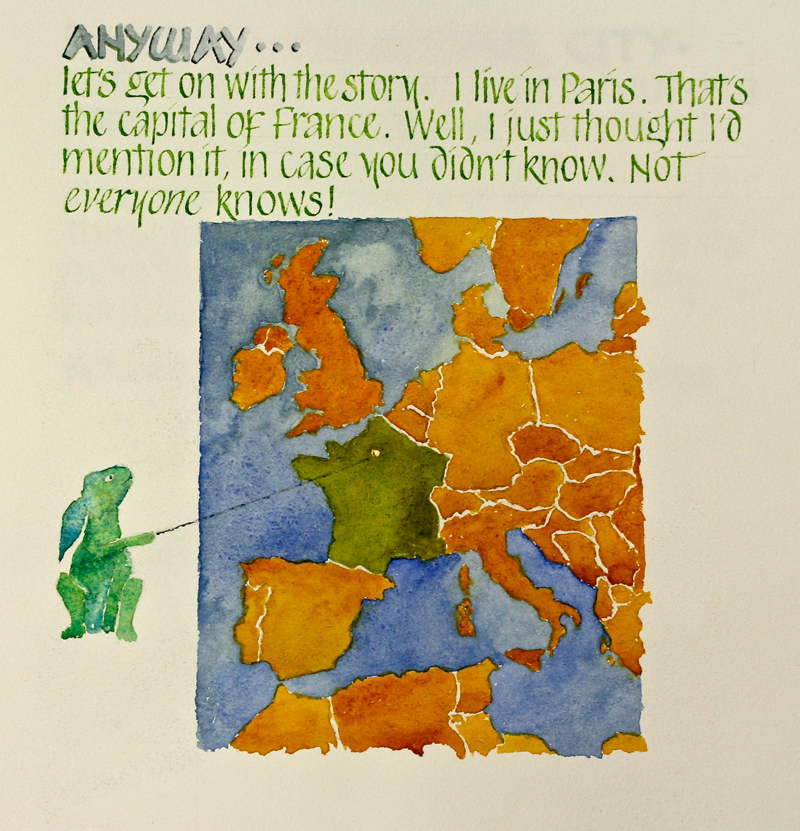

* * * * * * * *
This work was done by Carol Hall in Nashville this year for the fourth session of PRIMITIVE TO MODERN. In her own words:
|
First of all, the purple vellum is an inspirational in itself!
I wanted to do something that included the deep red color as part of the design. I have always loved this verse because of its passion, and had the thought to put the lettering into a flame pattern. I was also inspired by one of Friedrich Neugebauer's pieces in The Mystic Art of Written Forms for the curved line approach and the lettering style. I researched a bit on the color of fire, and learned that all of the colors of the rainbow are in fire, but that our eye does not detect the blue hues, seeing them only as white. |
So the blues are the hottest and then it proceeds out from
there to the red being the coolest. First, I gilded the heart with the sculpting medium as a base, then did the lettering with gouache. I did the red letters first, then the orange, yellow and white and then reversed the order. This was difficult in that I was unable to get into a "flow" because of all the color changes, but I enjoyed the challenge. Size is approximately 5"x5", mounted on board with colored tacks. |
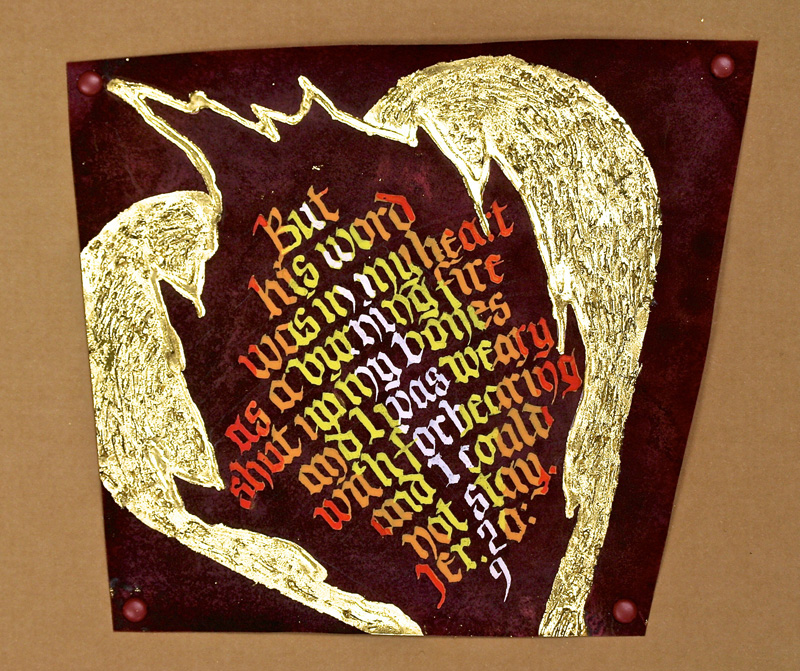
This work was done by Suzan O‘ Connor in San Antonio this year for the fourth session Carolingian
and Variations, in 26 Seeds: a Year to Grow. In her own words:
| I’m a beginning calligrapher. When Reggie teaches us a letterform, I always look up its history and usage before attempting to practice it. Many of the examples of Carolingian that I found were in lovely illuminated manuscripts, so I decided to attempt my own. The border was inspired by a 15th century parchment that is catalogued in the British Library. |
After sketching with pencil on Arches Text Wove, I used
watercolor to paint in the border (Holbein #190 Gold worked well
as a background), and then I embellished it with 23K patent gold
over Instacoll. I chose the Beverly Hillbillies text because it
made me laugh to combine something so rustic with something so
formal. My favorite part is the possum heraldic crest. I think
Jed would have loved it. Size 8” x 10”. |
* * * * * * * * * * * *
|
The answers to most of your questions
regarding PRIMITIVE TO MODERN or 26 Seeds: a Year to Grow can be found
through the main page at the web
www.reggieezell.com . Reservations are now being taken for next years classes. You can also contact me directly at contactreggie@comcast.net or 773-202-8321. There is now ONLY ONE slots left for a city in 2014. Thanks, Reggie
Please take a look
at my new, 5 minute video on You Tube (link below). It’s an excerpt from
my soon to be available one hour long video This video and at least two others ( “Italic” and “Carolingian”) should be available on line as downloads early in 2014 for $10 each. I’m very close to working out the details. Please enjoy. Please Click below or go to You Tube and type in Reggie Ezell Channel to see several short (free) Calligraphy videos. http://www.youtube.com/reggieezell Go to All Picks for 2013 CALENDARS FOR 2013, 2014, 2015, 2016 & 2017 CLICK HERE |